Welcome to Documentation for Artis WordPress Theme.
Hello, you are looking at the documentation for Artis WordPress theme created by realtheme. Here you will learn how to set up the theme and customize it to fit your needs. Artis is a modern Full Site Editing theme with several of useful custom Gutenberg block plugins.
This guide is designed for beginner users. If you come across something that isn't covered or is unclear, please visit the support tab on the ThemeForest portal and submit your question.
Getting Started
After downloading the purchased ZIP archive from ThemeForest and unzipping it, you will find the following files:
- artis.zip – main theme ZIP file (a fully installable theme ZIP package, including all required plugins).
- documentation – a link to the online documentation with installation instructions.
Theme Requirements
To ensure stable performance and full compatibility with all theme features, please make sure your server environment meets the following requirements.
Recommended Environment
- PHP: version 8.3 or later
- Database: MySQL 5.6+ or MariaDB 10.1+
- WordPress Memory Limit: 512 MB or higher
- HTTPS (SSL): required for secure connections and modern browser compatibility
Recommended PHP Configuration Limits
To successfully import demo content and avoid issues when using advanced theme functionality, your hosting server should be configured with the following PHP limits.
| Setting | Recommended Value |
|---|---|
| memory_limit | 512M |
| max_execution_time | 300 |
| max_input_vars | 3000 |
| upload_max_filesize | 64M |
| post_max_size | 64M |
Installation
Steps to install the theme:
-
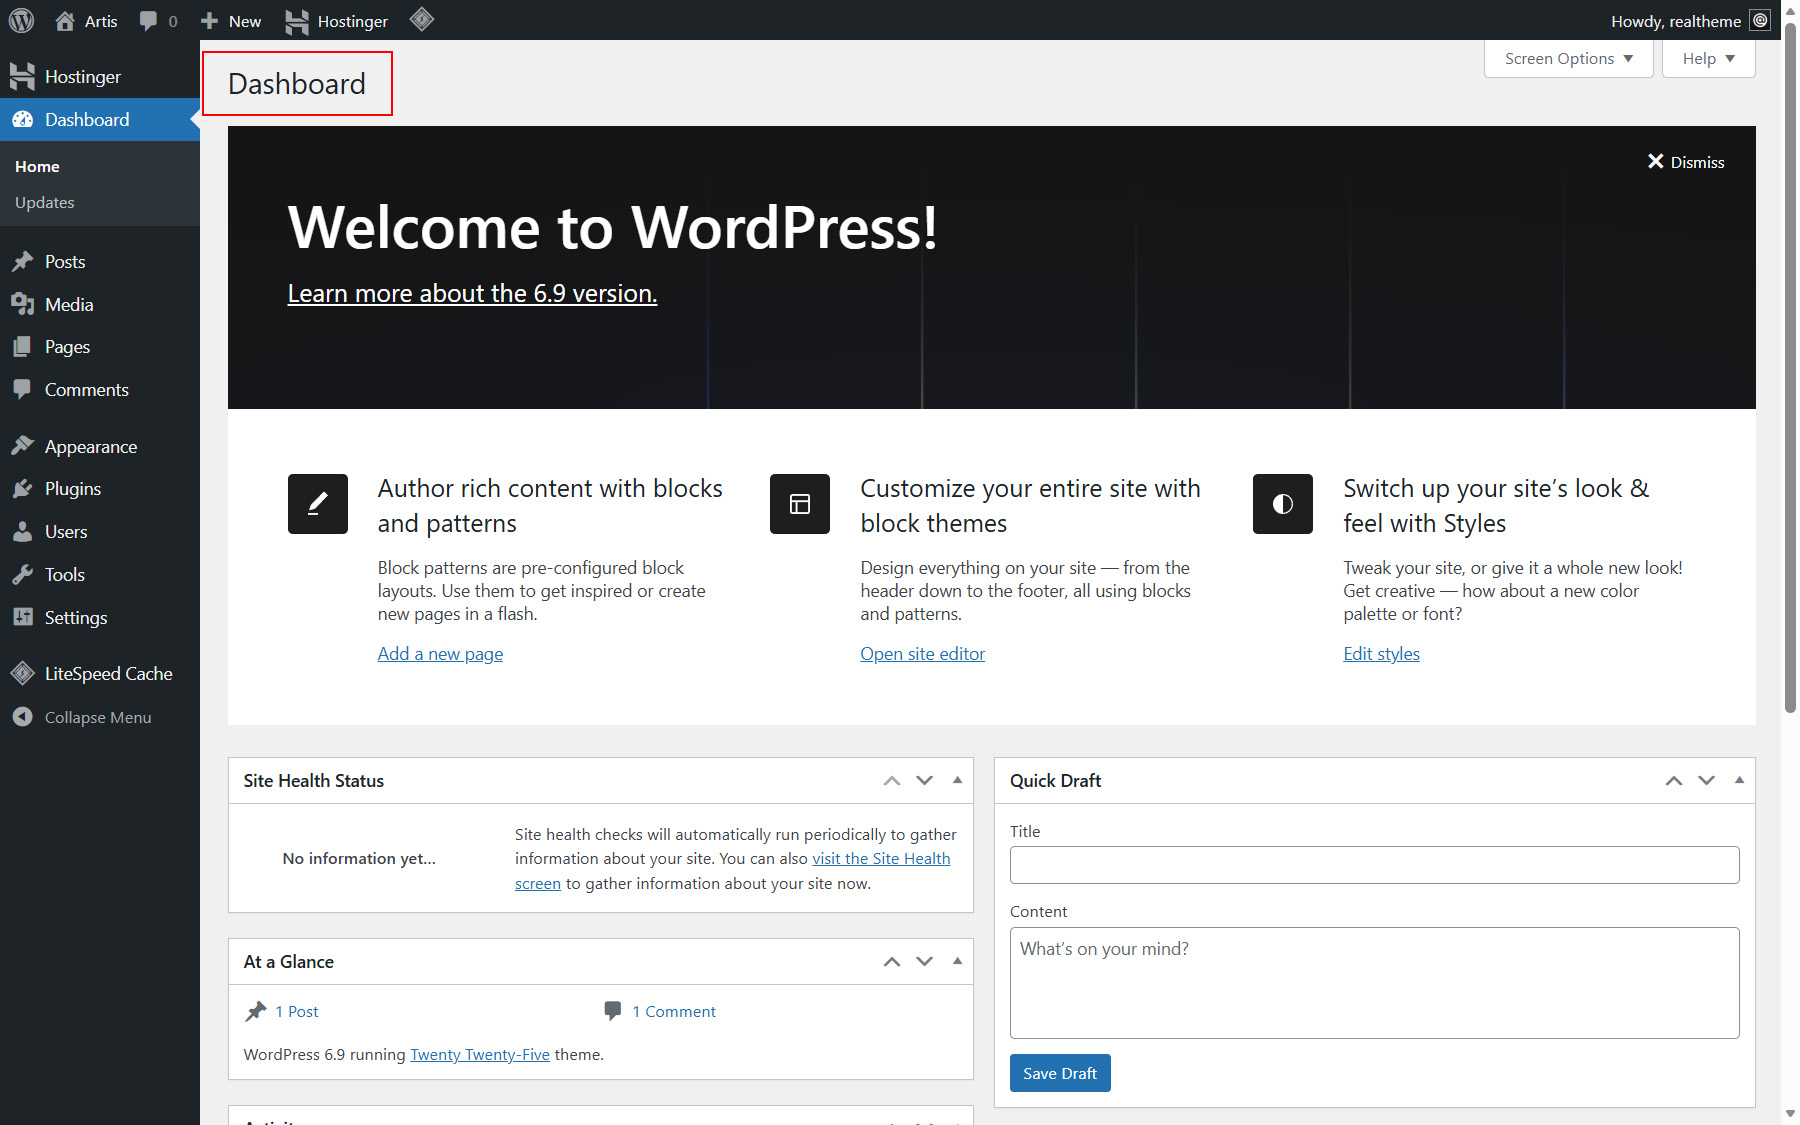
Login on your WordPress Admin Dashboard. (see Picture 1)
-
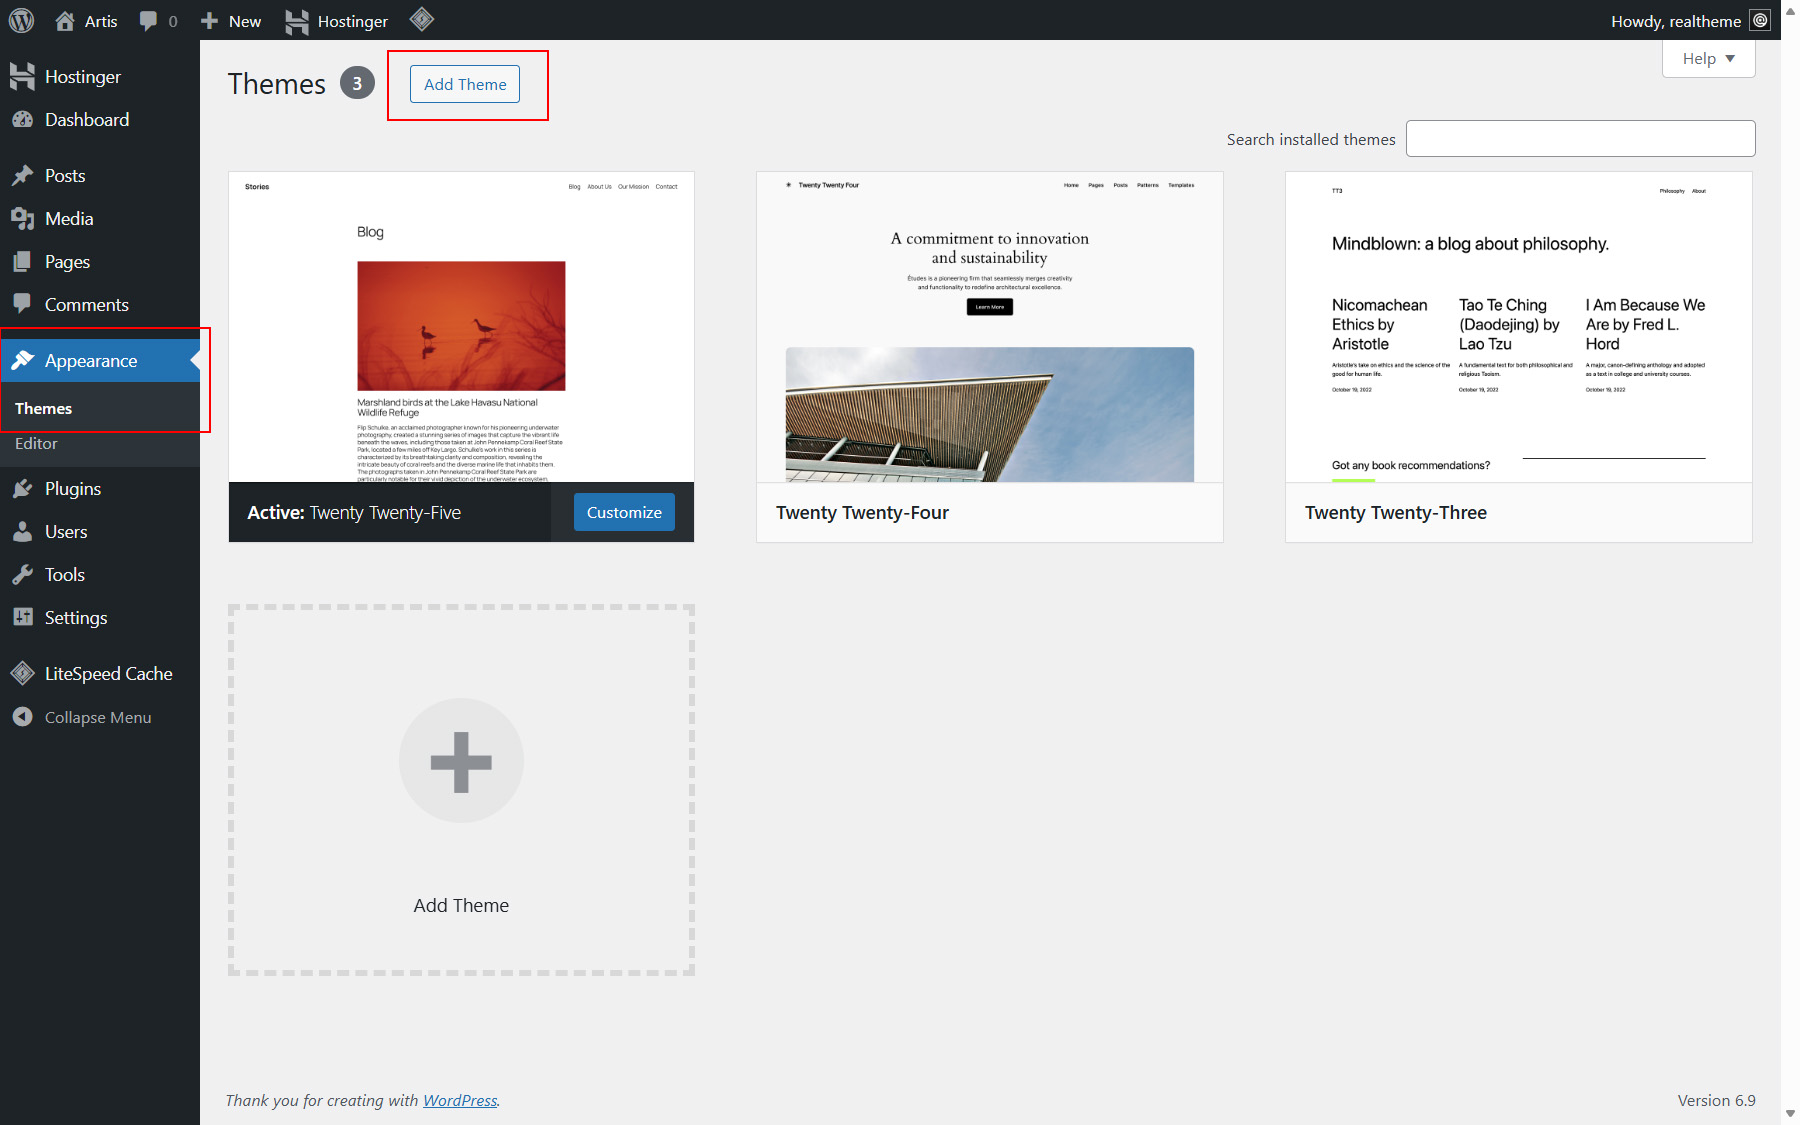
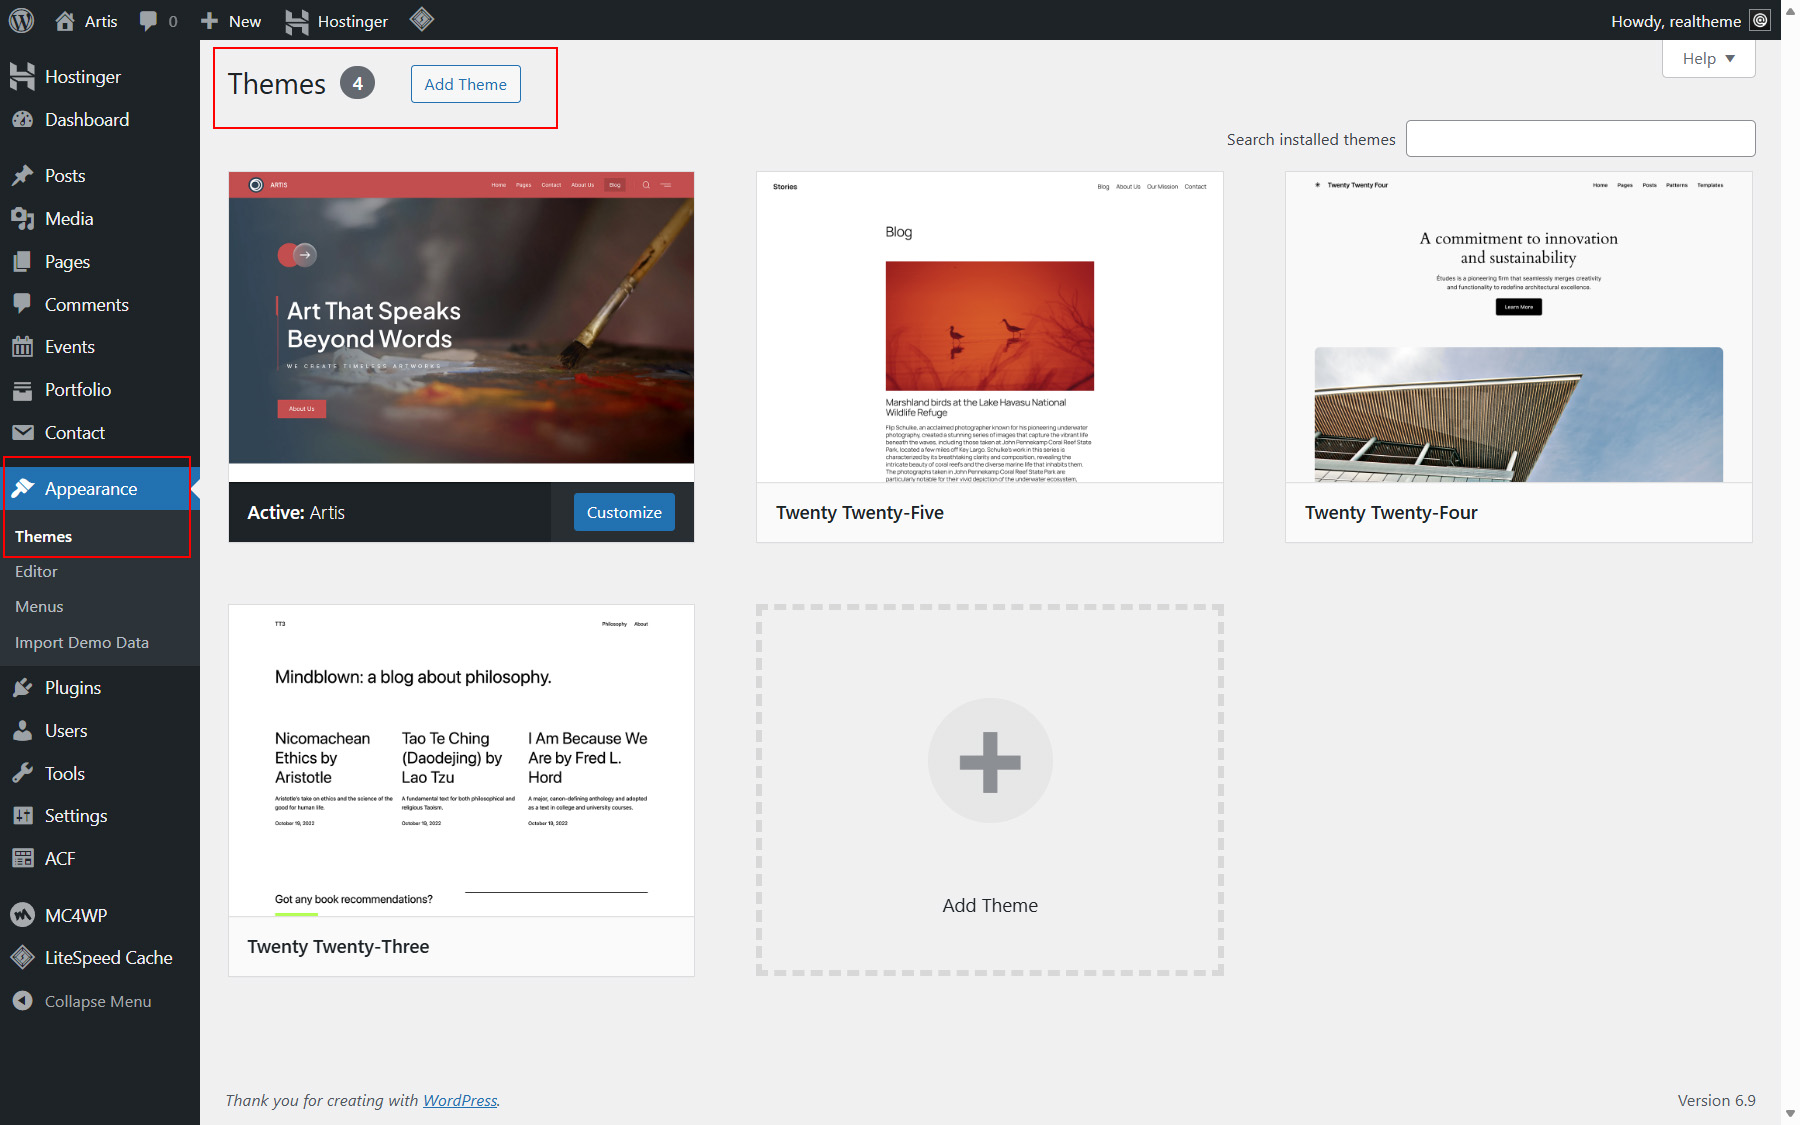
Select Appearance > Themes menu item. (see Picture 2)
-
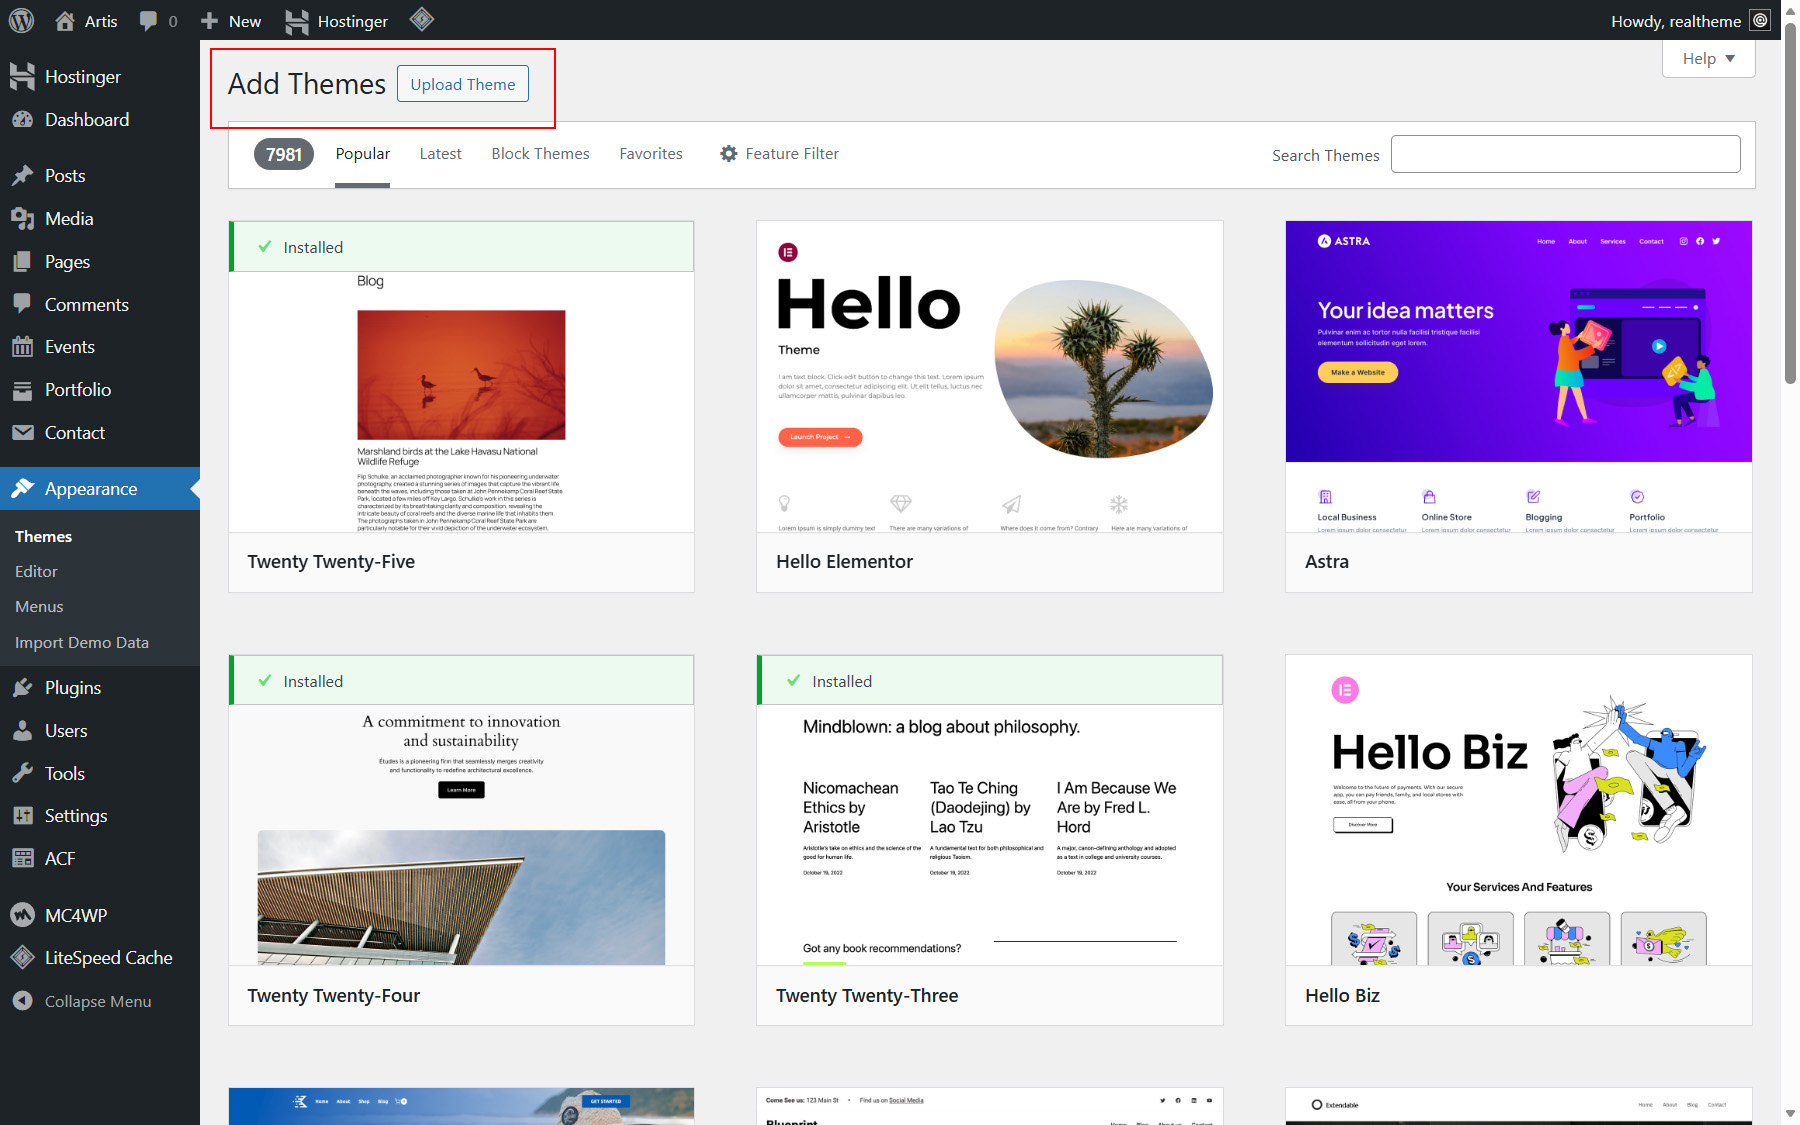
Click Add Theme button. (see Picture 3)
-
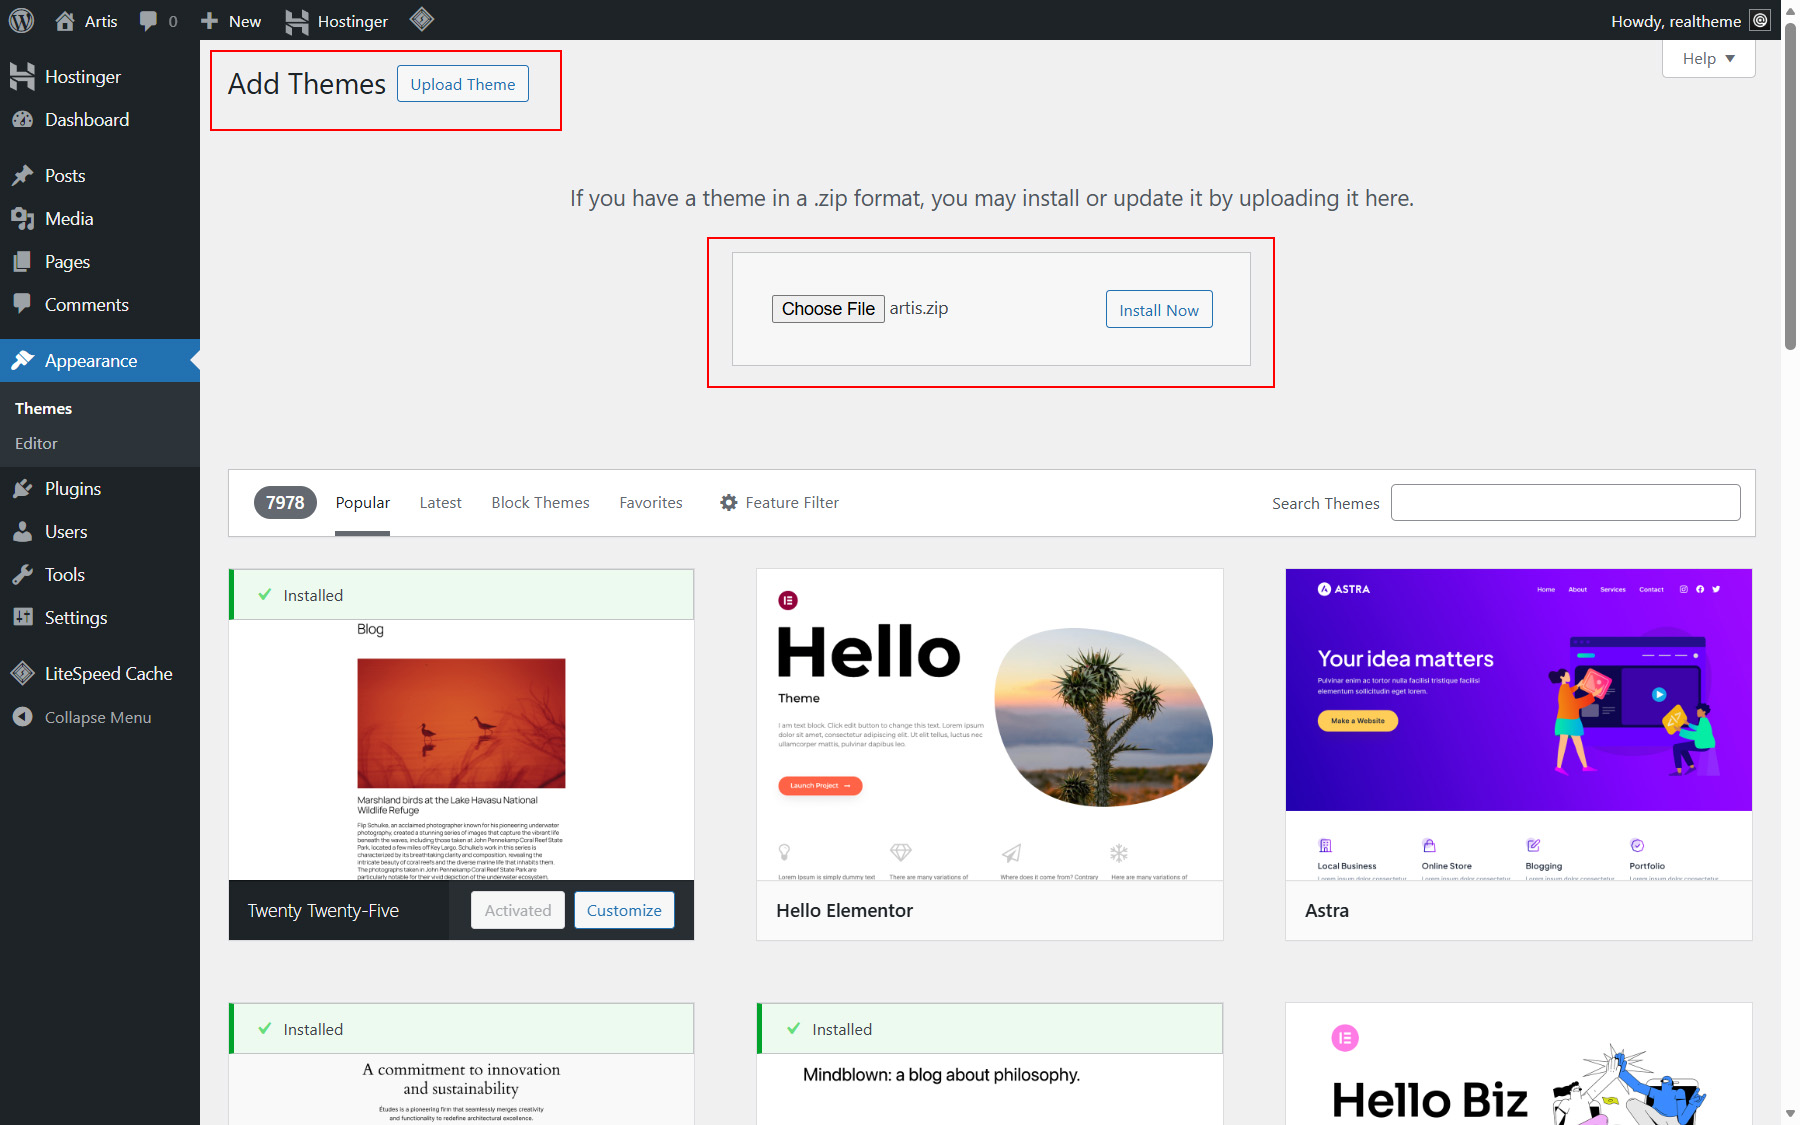
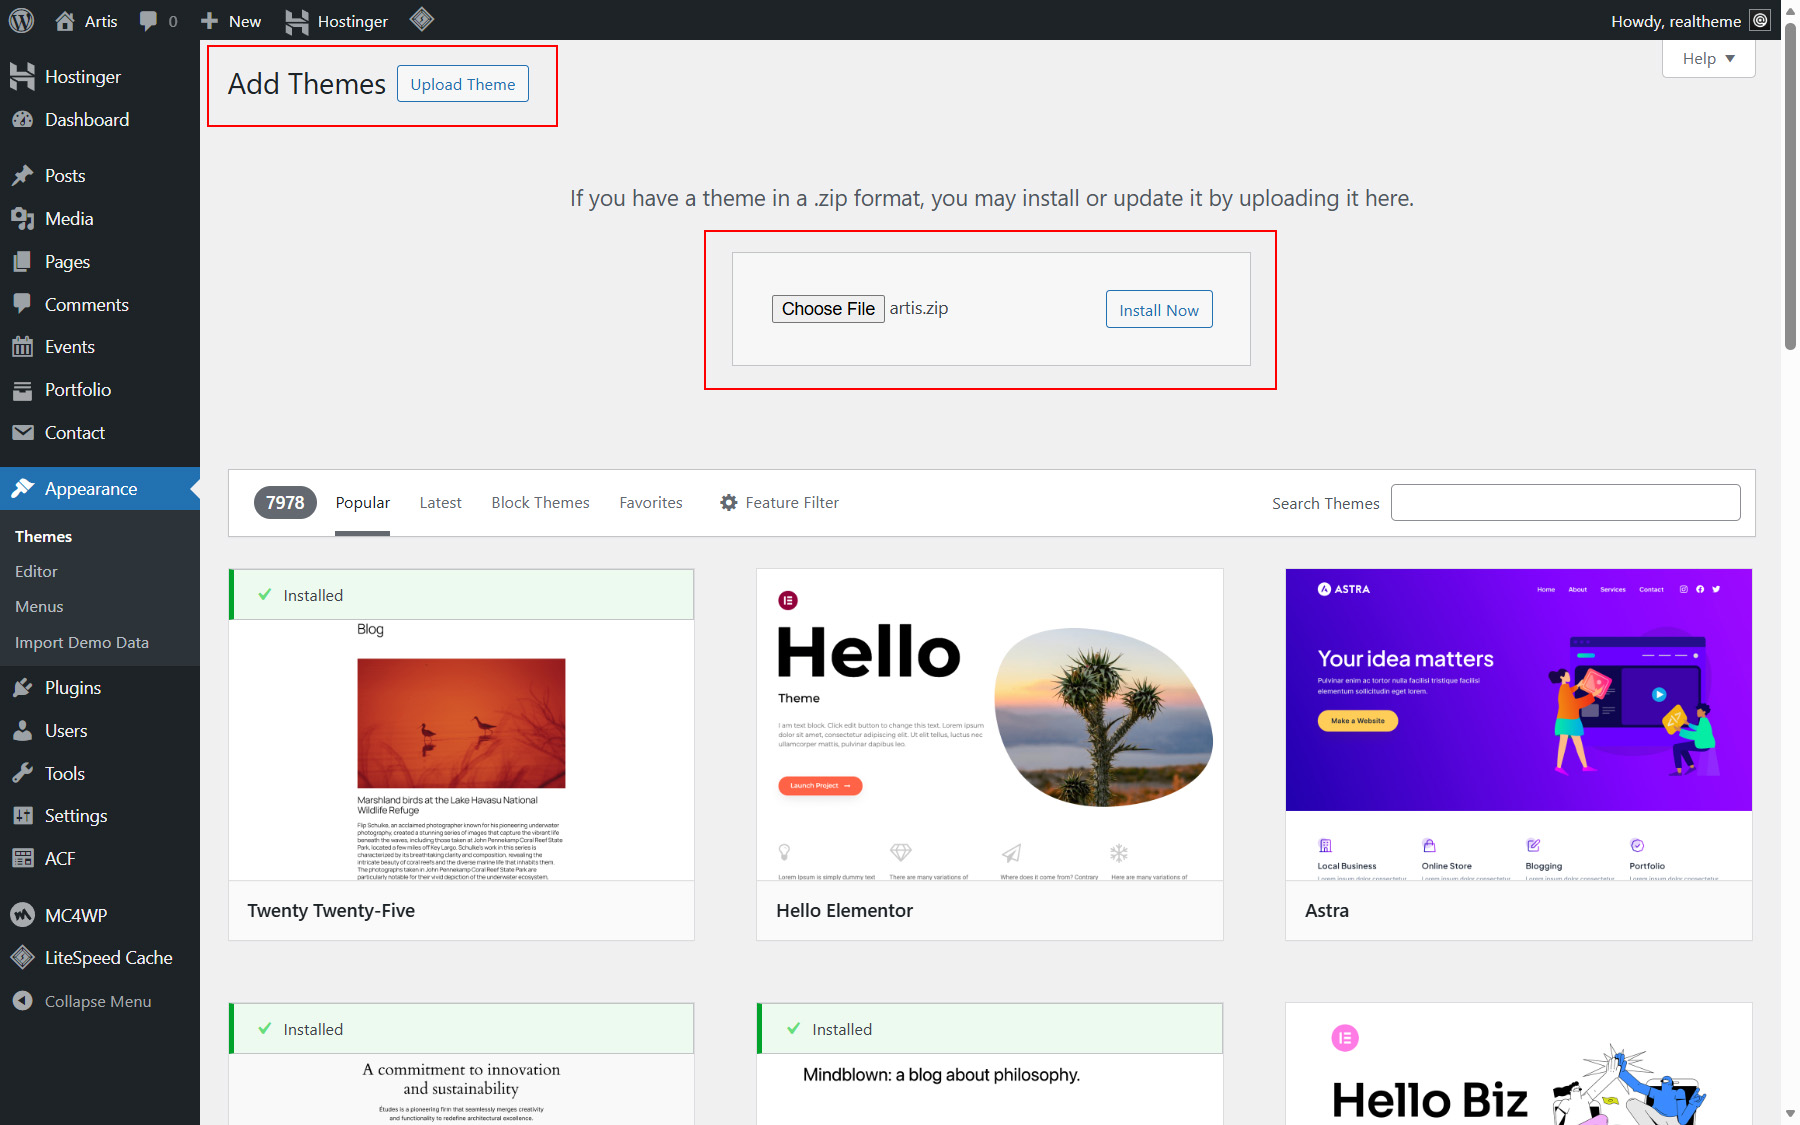
Click the Upload Theme button (see Picture 4), then click Choose File. (see Picture 5)
-
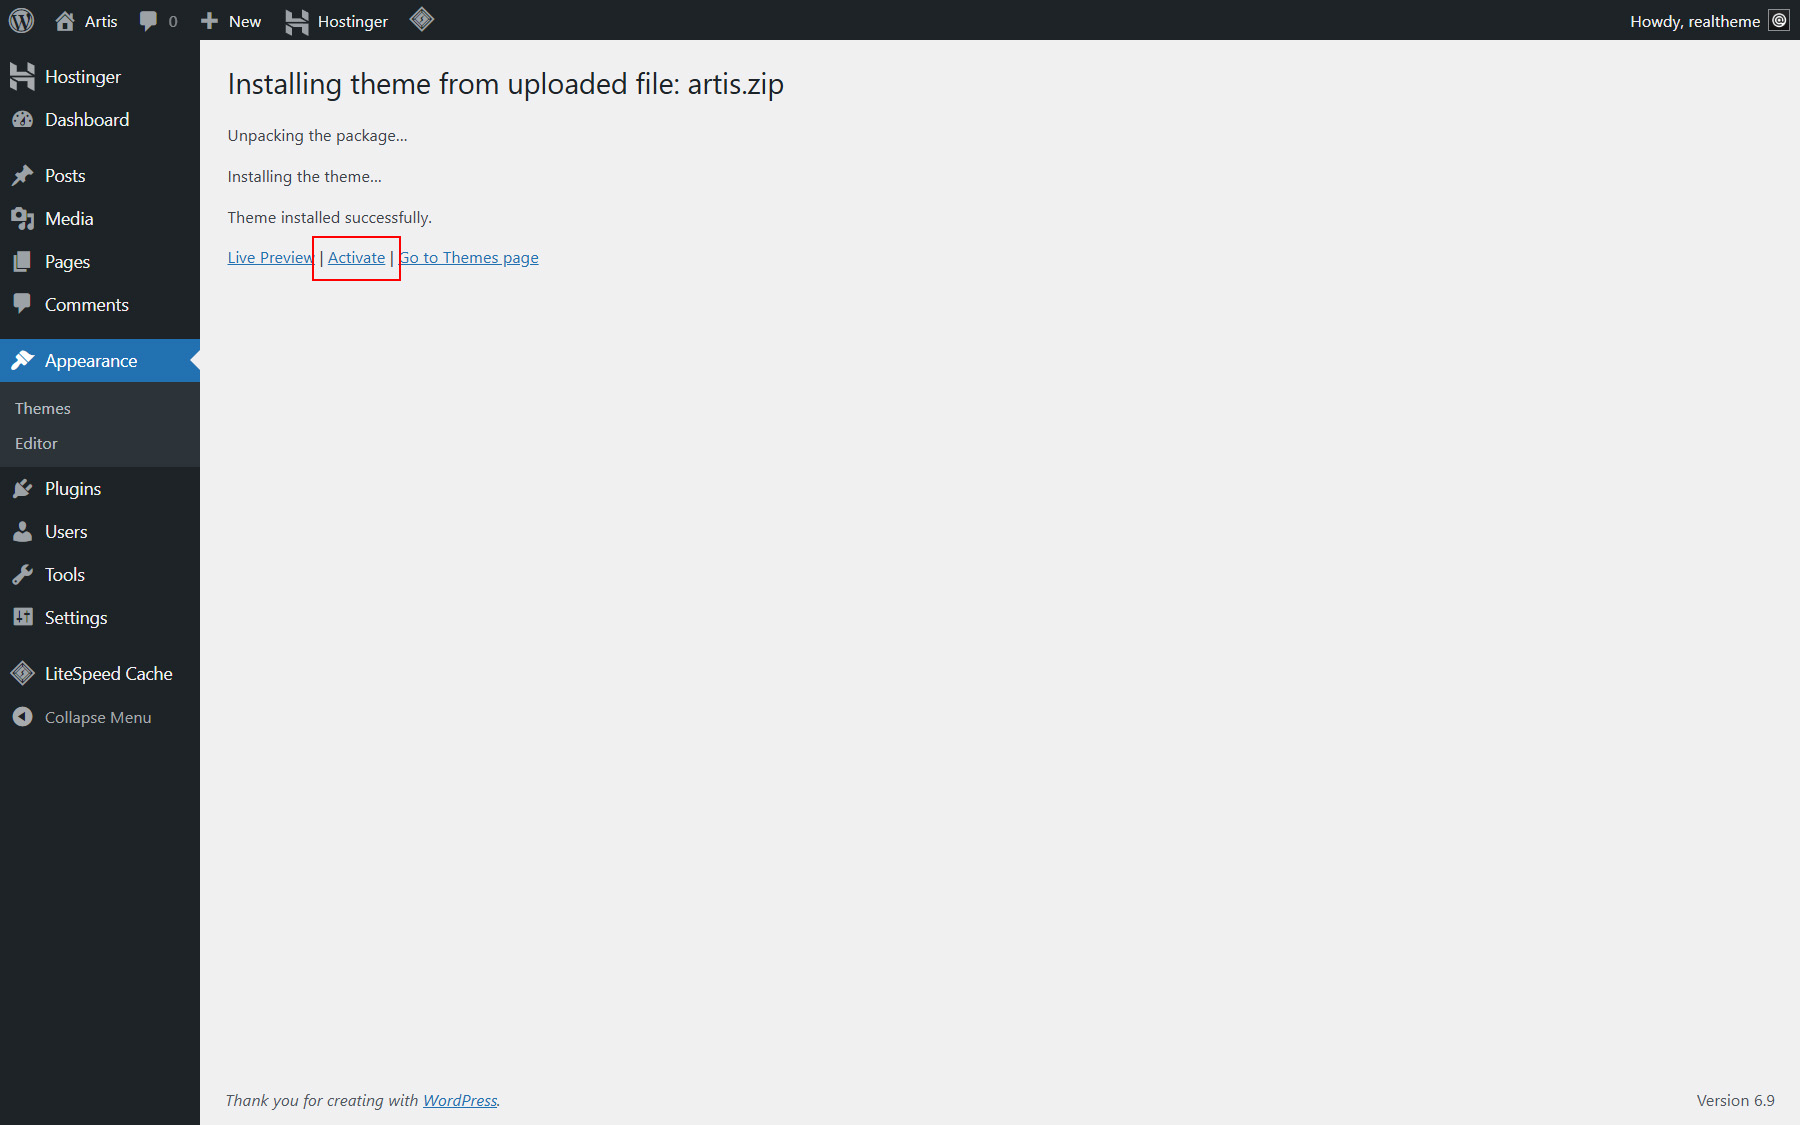
In the dialog box that opens, select the previously downloaded artis.zip archive and upload it. Once the upload is complete, click the Install Now button to install.
-
Now you can activate the theme you just installed by clicking Activate button. (see Picture 5)
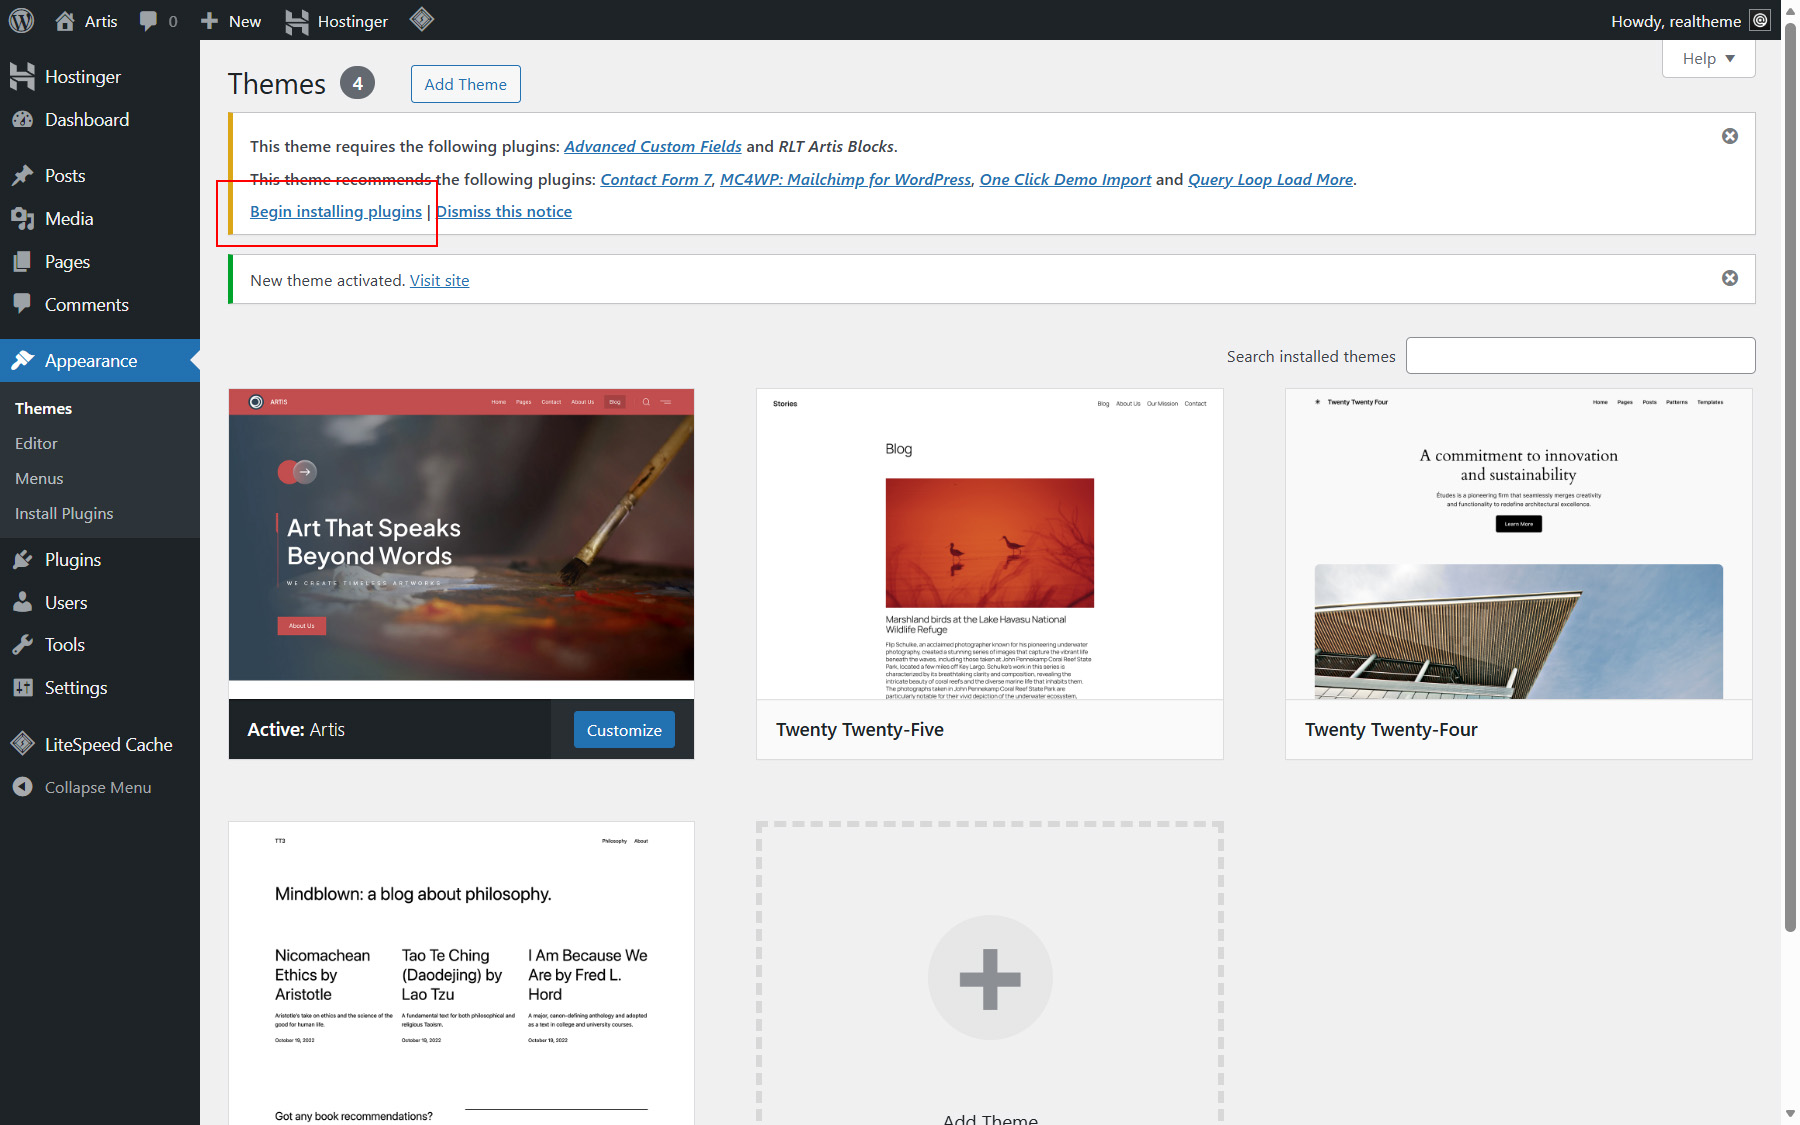
-
After installing and activating the theme, you will see a notification box prompting you to install the required and recommended plugins. Proceed with the installation of the necessary plugins by clicking the "Begin installing plugins" link (see Picture 6).
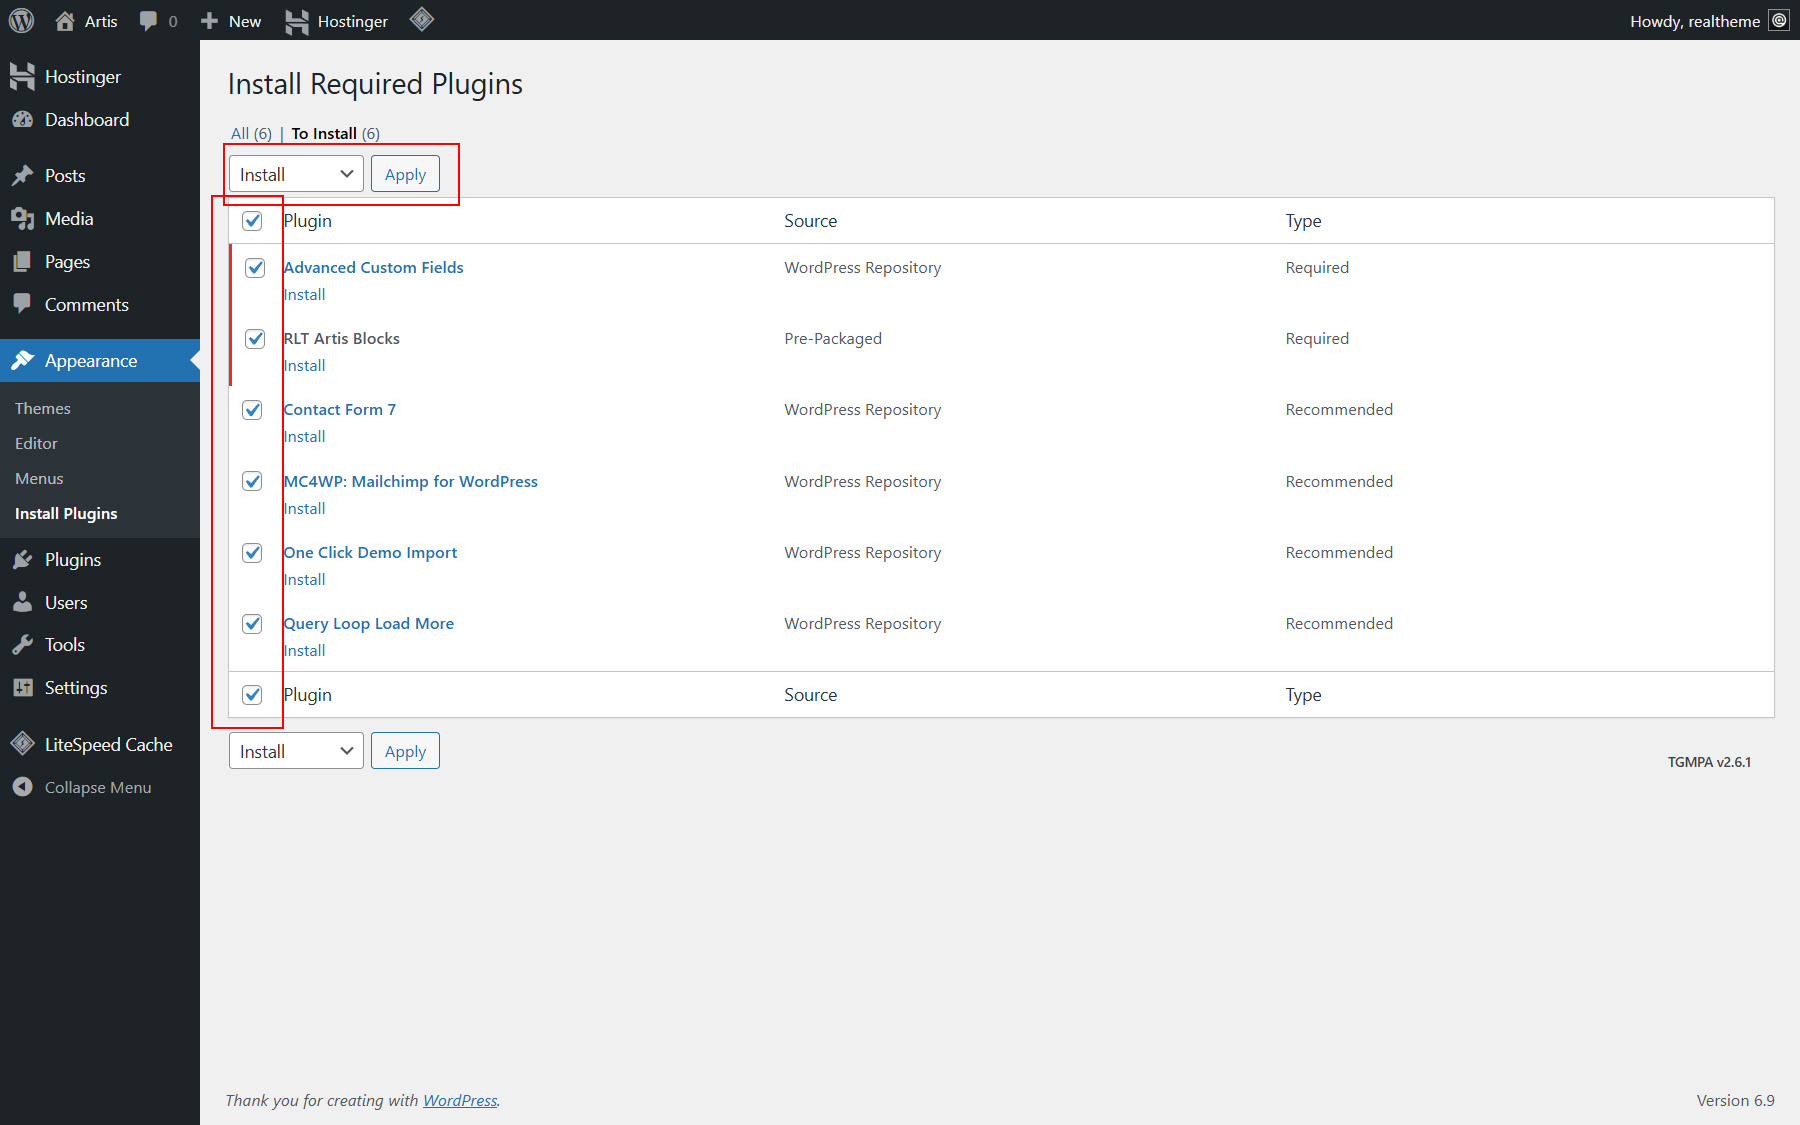
-
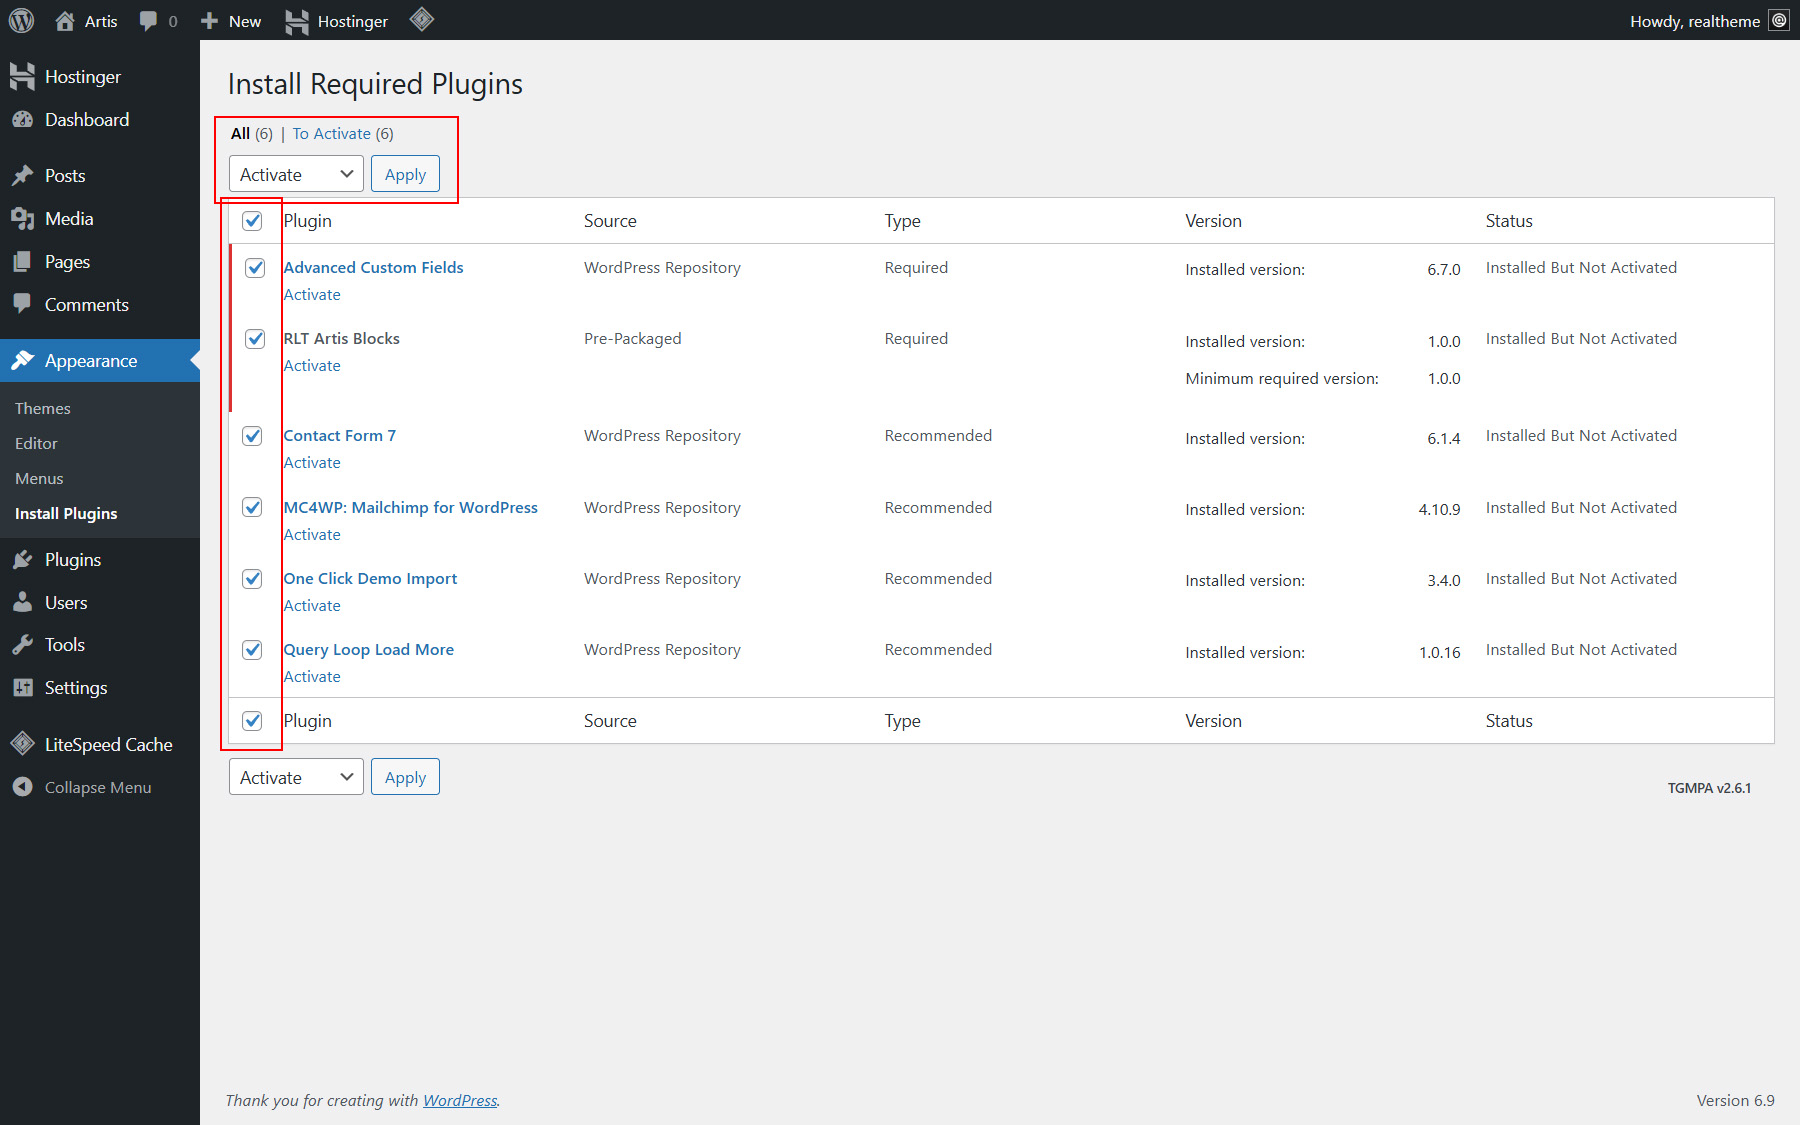
On Install Required Plugins page (see Picture 7), select all the plugins, choose the "Install" option from the bulk actions dropdown, and click "Apply" (see Picture 8).
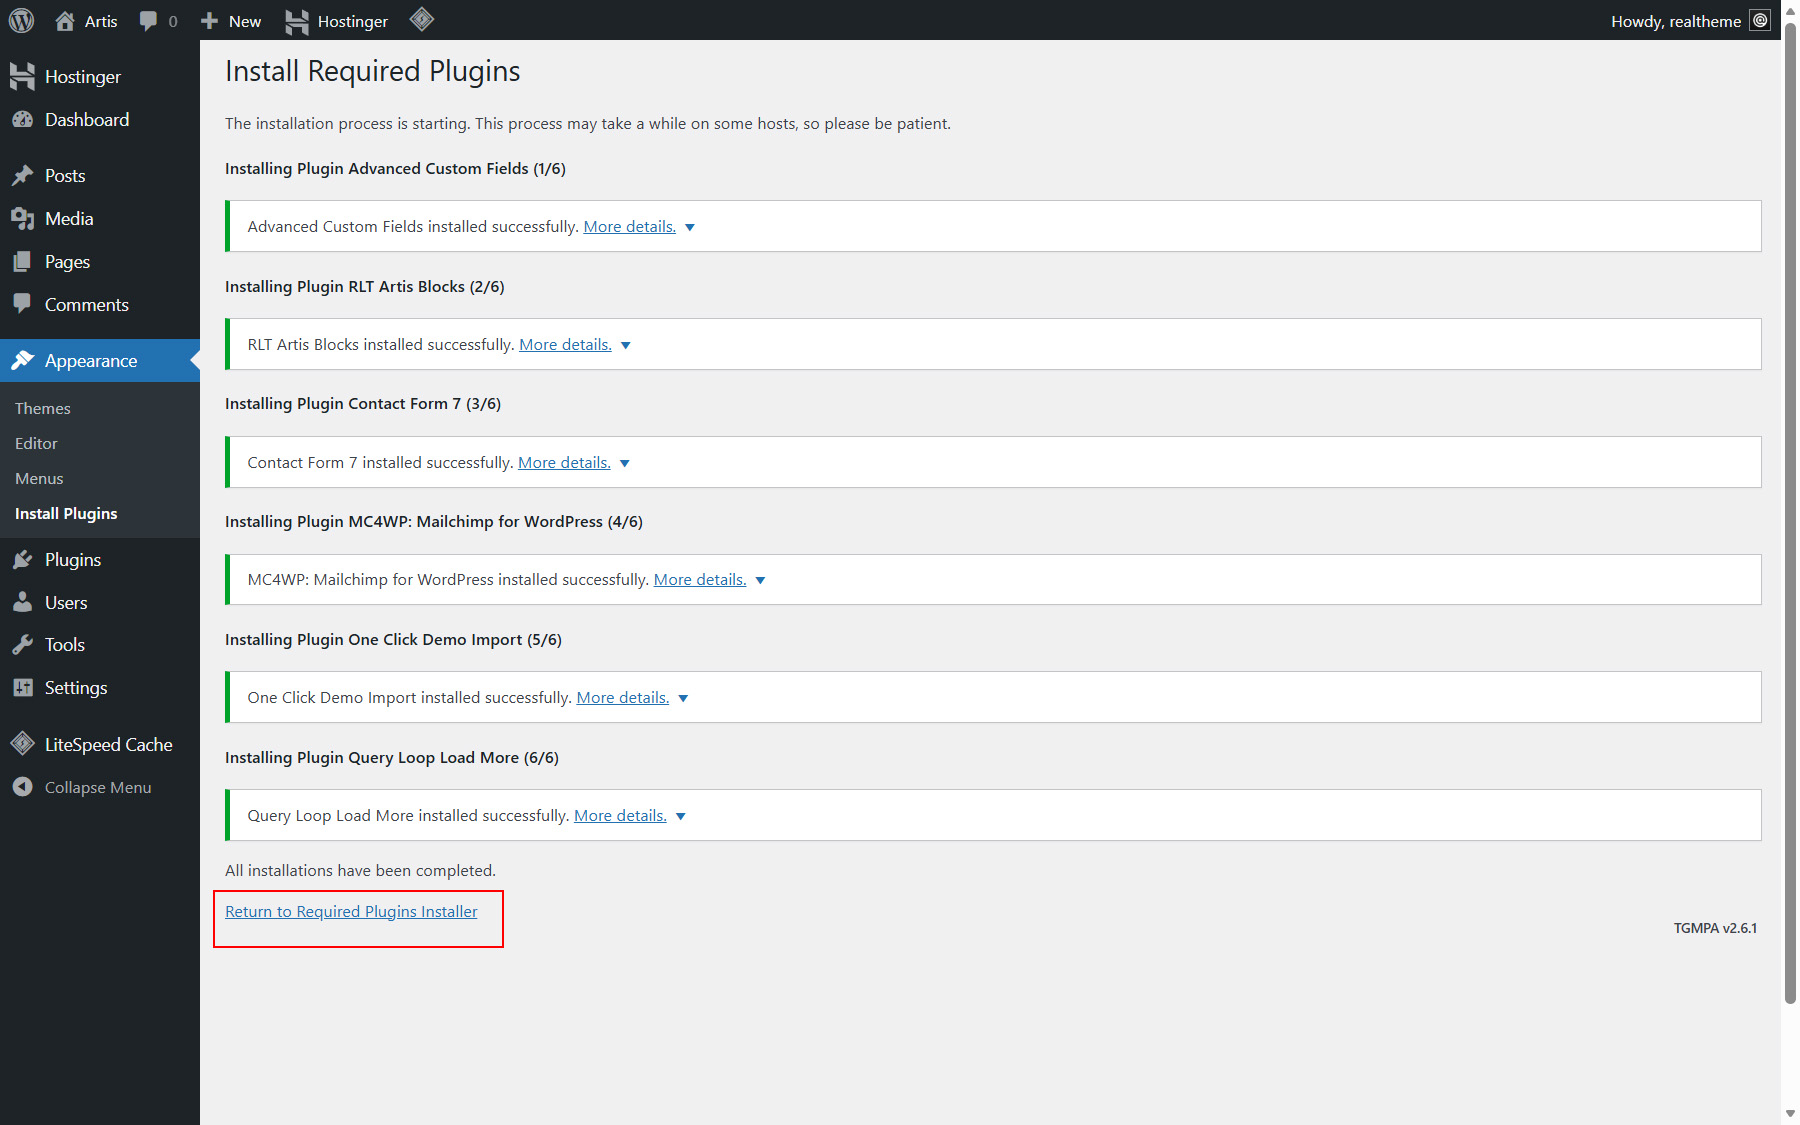
-
After successfully completing the plugin installation, click on "Return to Required Plugins Installer" (see Picture 9)
-
Once again, select all the plugins, choose the "Activate" option from the bulk actions dropdown, and click "Apply" to activate them (see Picture 10).
-
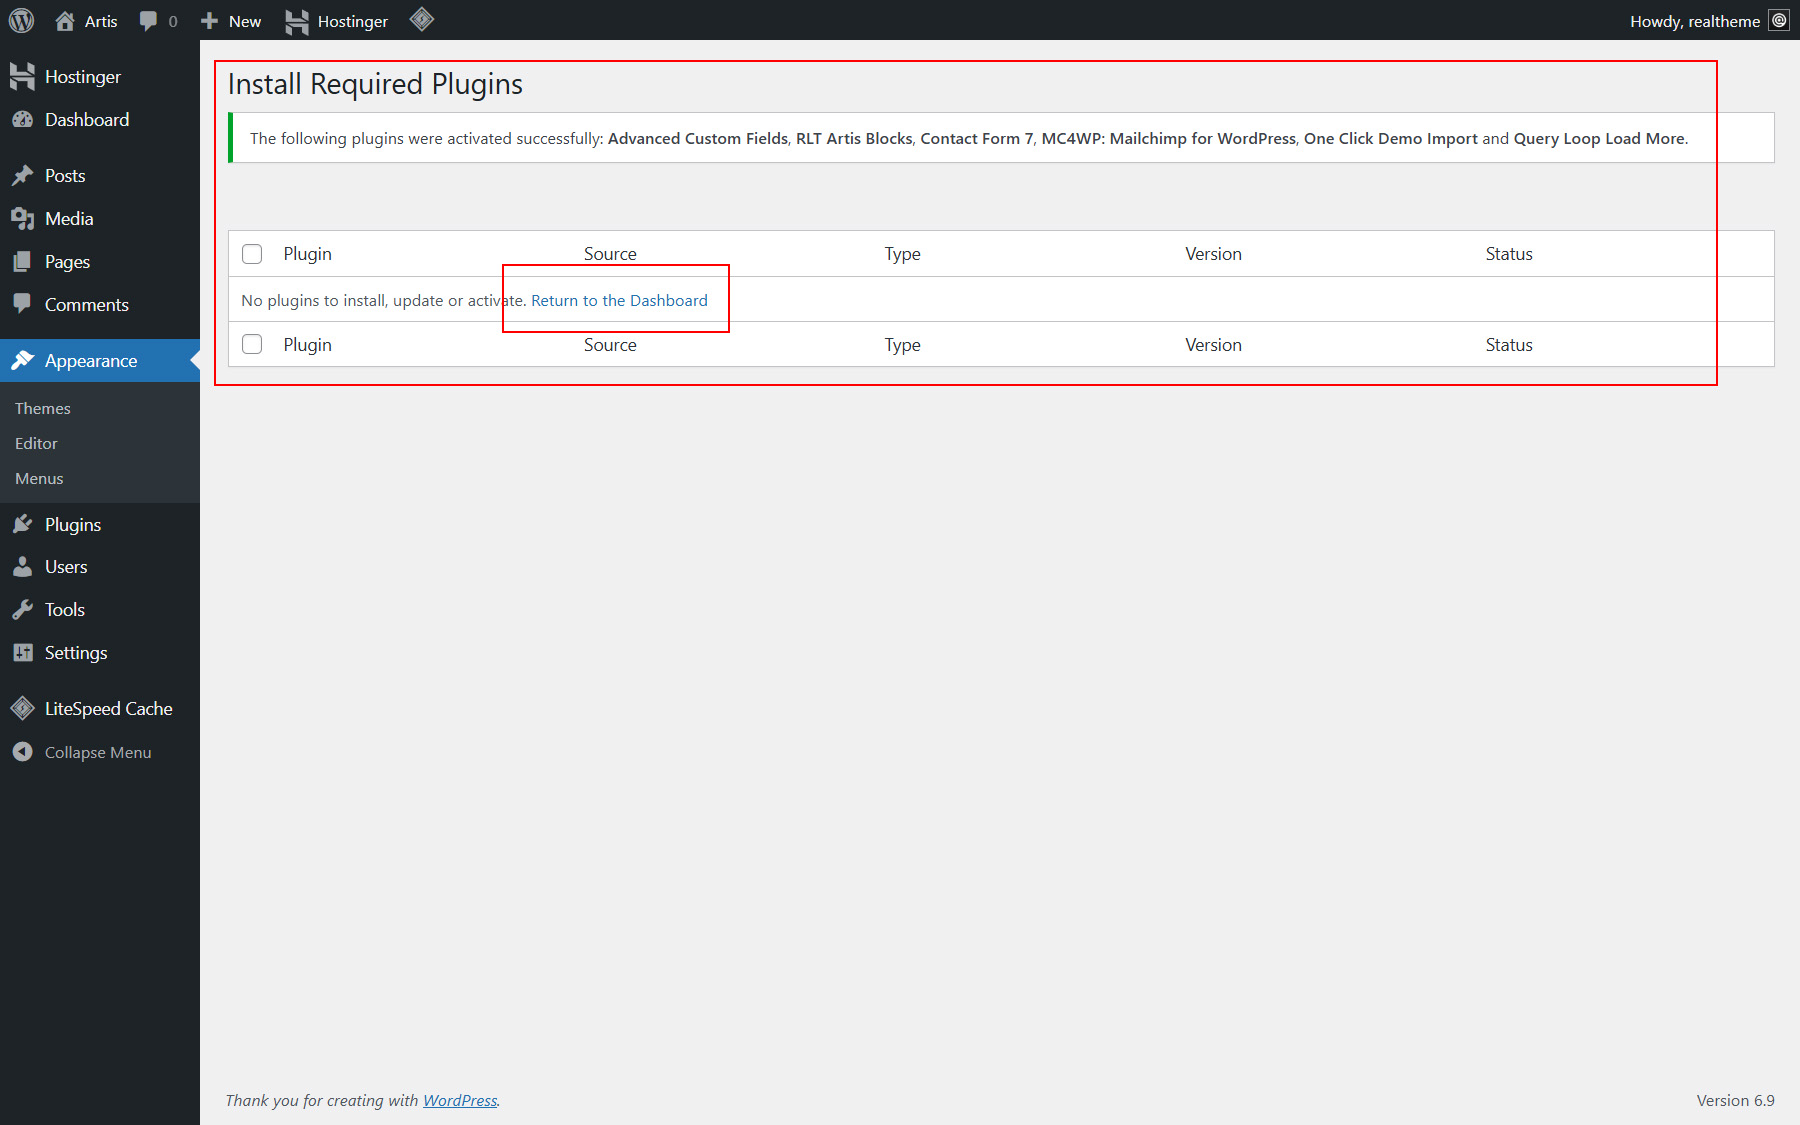
The installer should confirm that the plugins have been successfully activated (see Picture 11). You can now return to the Dashboard and proceed with installing the demo content. Instructions are provided in the next section.

For more info check https://wordpress.org/documentation/article/work-with-themes/
Here is a collection of helpful resources for learning about WordPress:
- WordPress Codex – a comprehensive guide with instructions on installing WordPress on your server.
- Getting Started with WordPress – an overview covering various essential topics for beginners.
- WordPress Beginner FAQ – answers to frequently asked questions for new WordPress users.
Import Demo Content
The demo content installs all necessary pages required for the proper functioning of the theme, as well as several demo posts that can be safely removed later.
If you choose to import the demo content, you can do so using the One Click Demo Import plugin. Follow the plugin's instructions to complete the import.
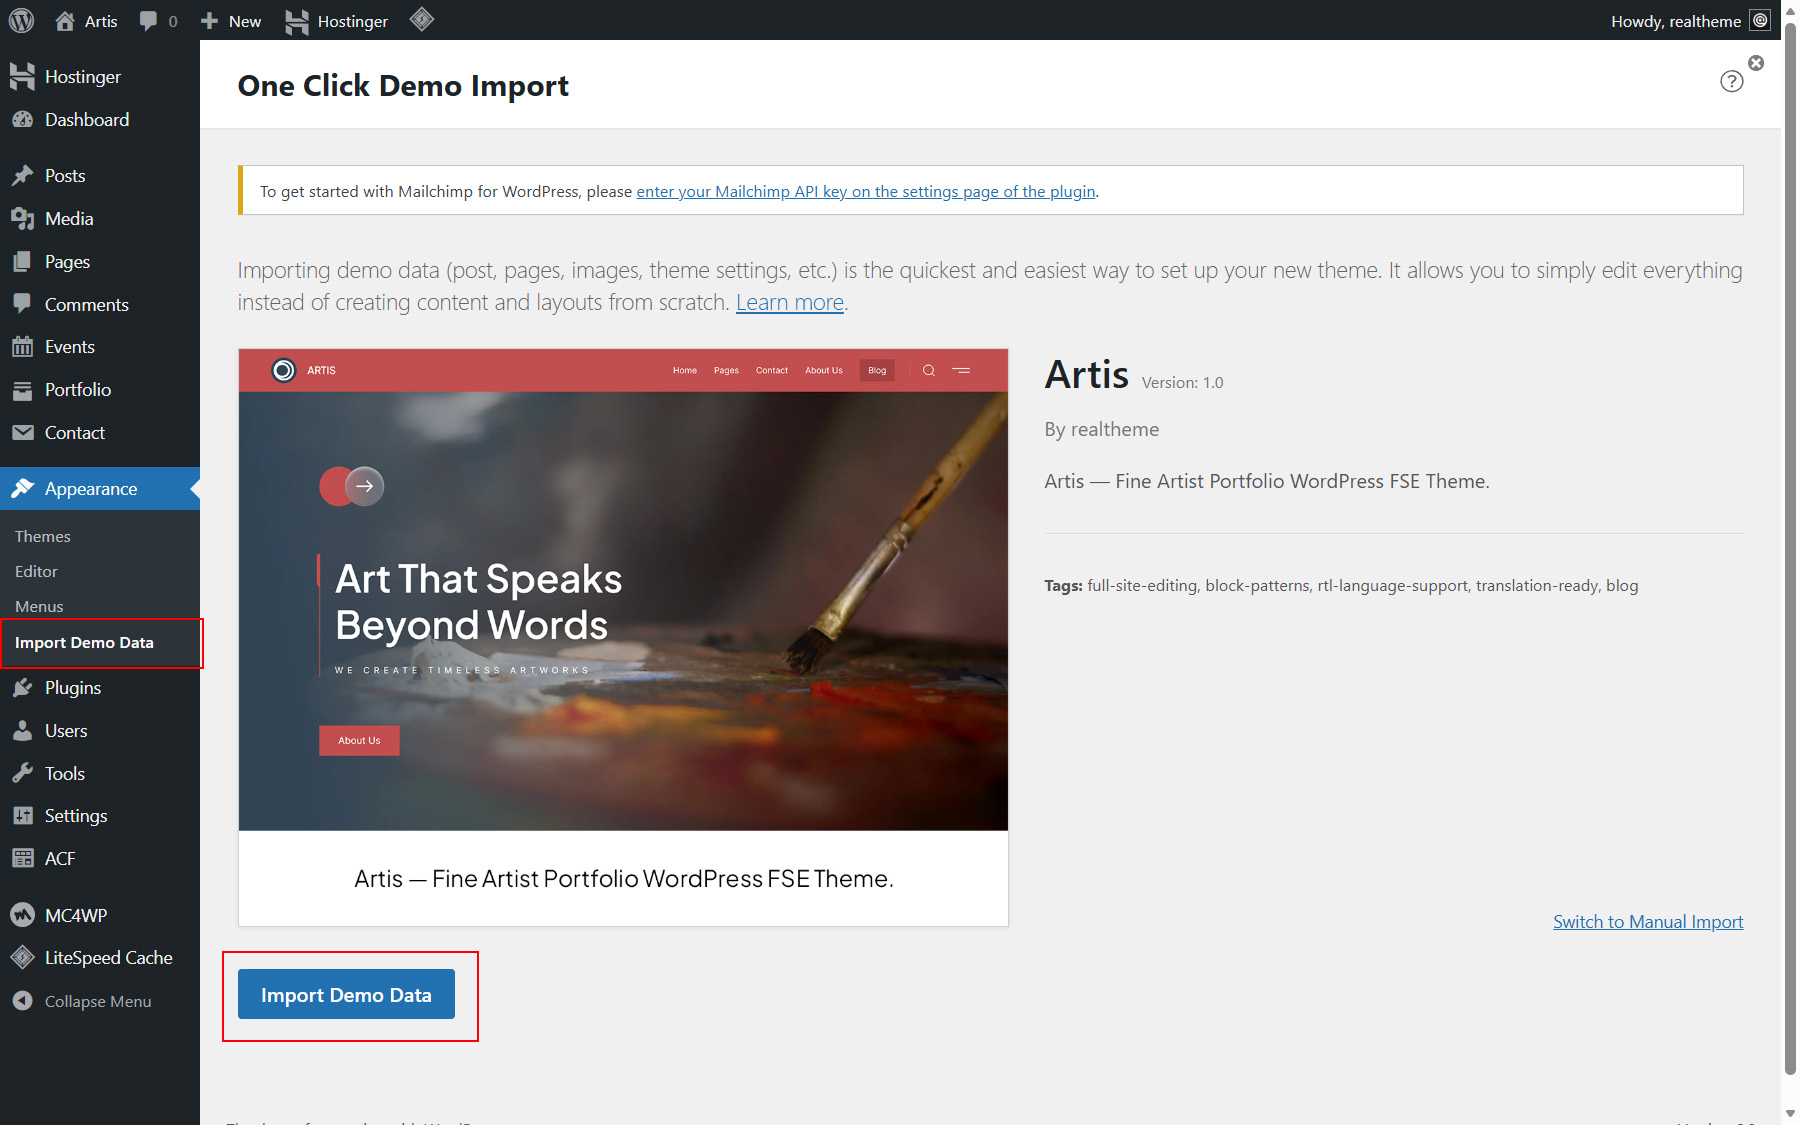
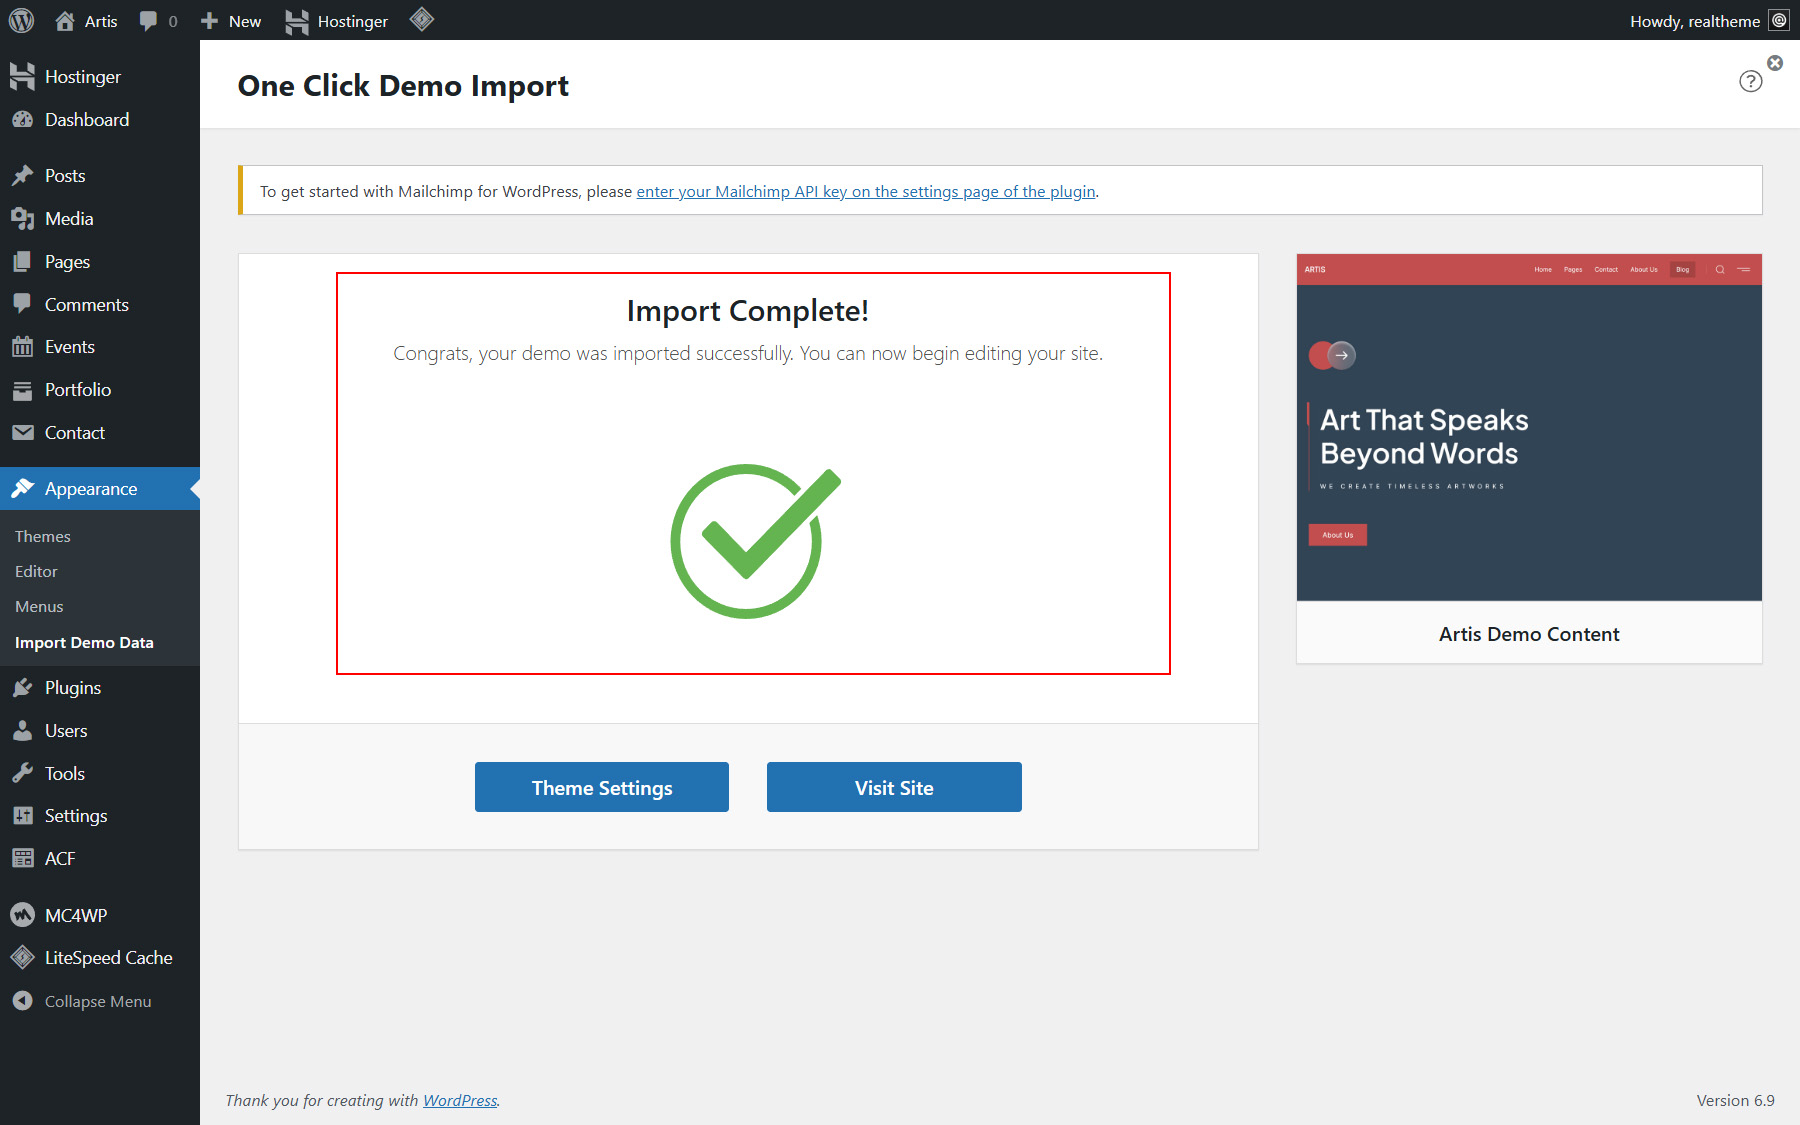
Go to Appearance → Import Demo Data, click Import Demo Data (See Picture 1), then click Continue & Import (See Picture 2) and wait until the import process is completed (See Picture 3).

After you have confirmed that the theme is functioning correctly, you may safely remove the following demo content:
-
The post “The Art of Creative Expression”.
-
The tag “fine art”.
-
The portfolio item “Whispers of Spring Bloom”.
-
The portfolio category “Blossoms”.
-
The events “Colors in Motion: A Contemporary Art Exhibition” and “The Art of Process: Live Painting & Studio Talk”.
-
The event category “Exhibition”.
Updating
To ensure a smooth theme update, it is essential to back up both your database and any modifications made to theme files. Following the update, you'll need to reapply any changes made to your files.
-
Go to Appearance > Themes > Add Theme. (see Picture 1)
-
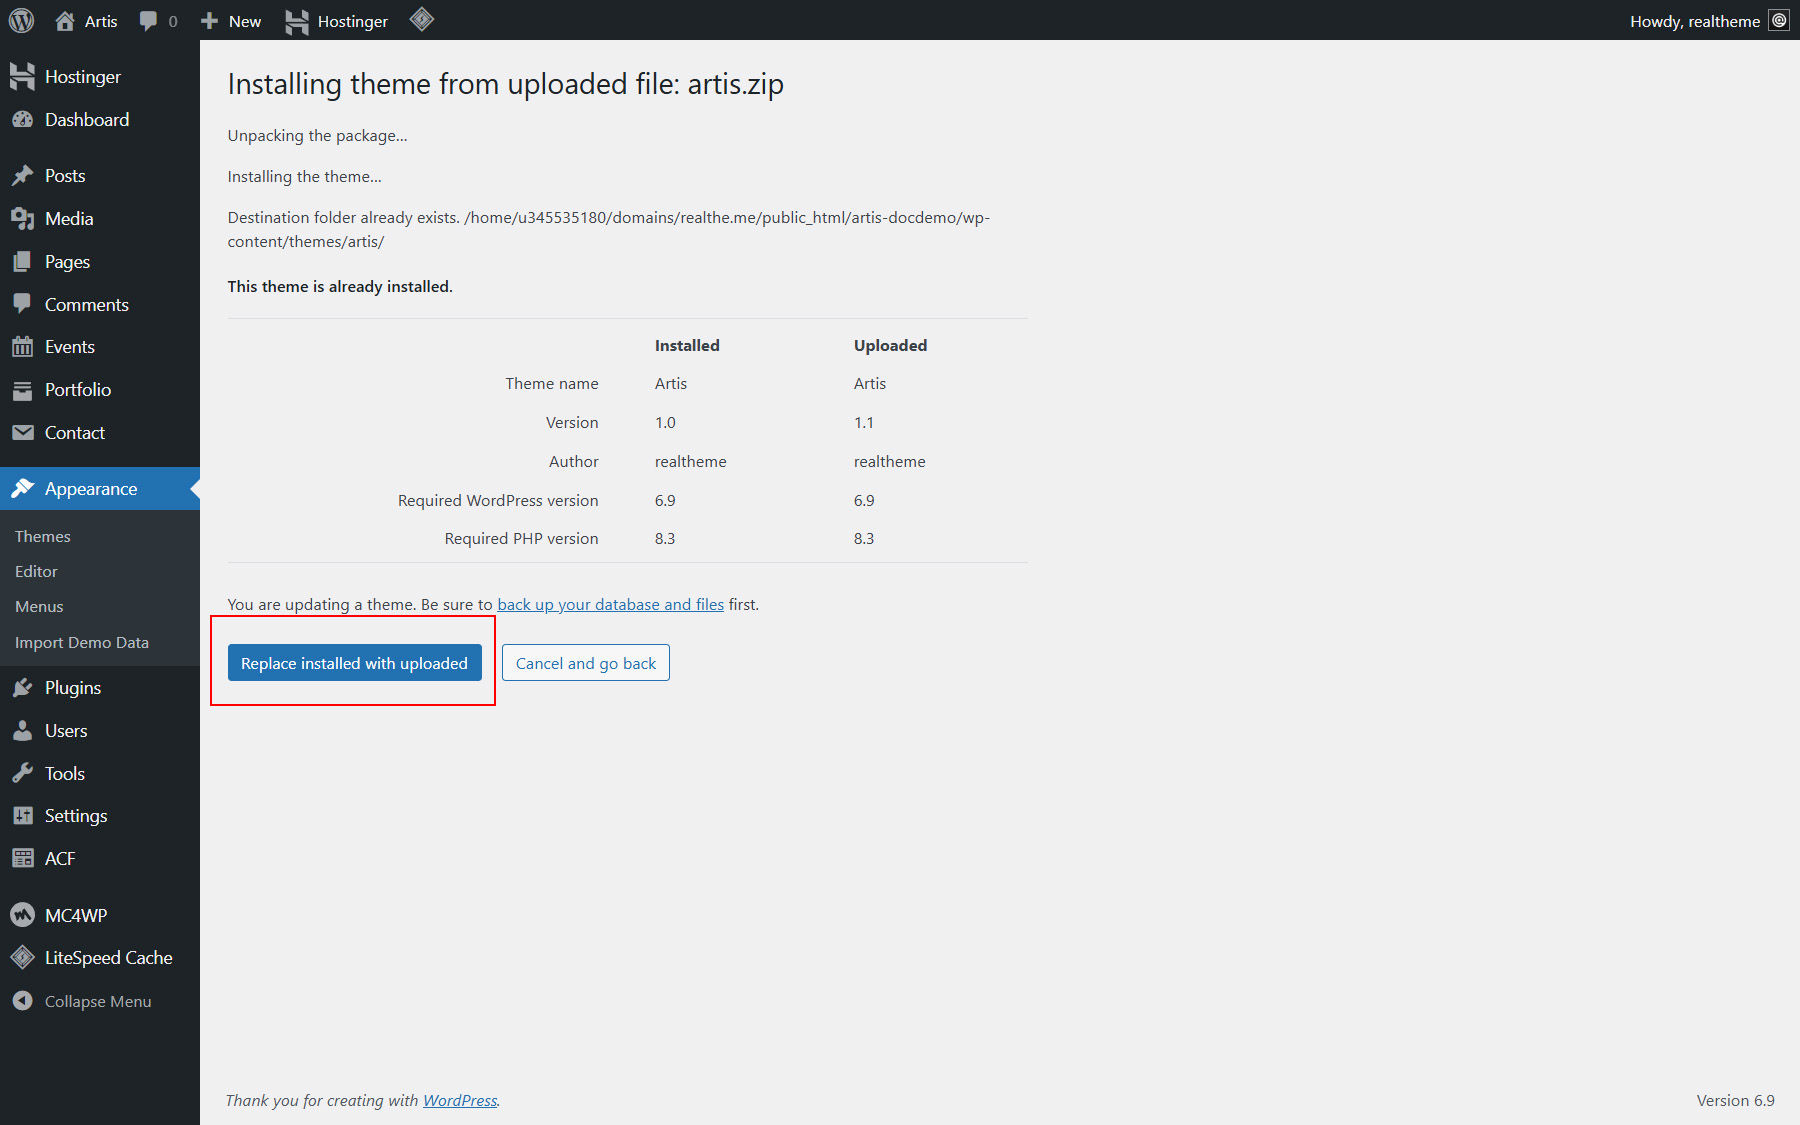
Upload the ZIP file of the latest version of your Artis theme from your computer. Click Upload Theme, then Choose File, locate the theme ZIP file on your computer, and finally click Install Now. (See Picture 2)
-
Click Replace installed with uploaded button when prompted (See Picture 3).
-
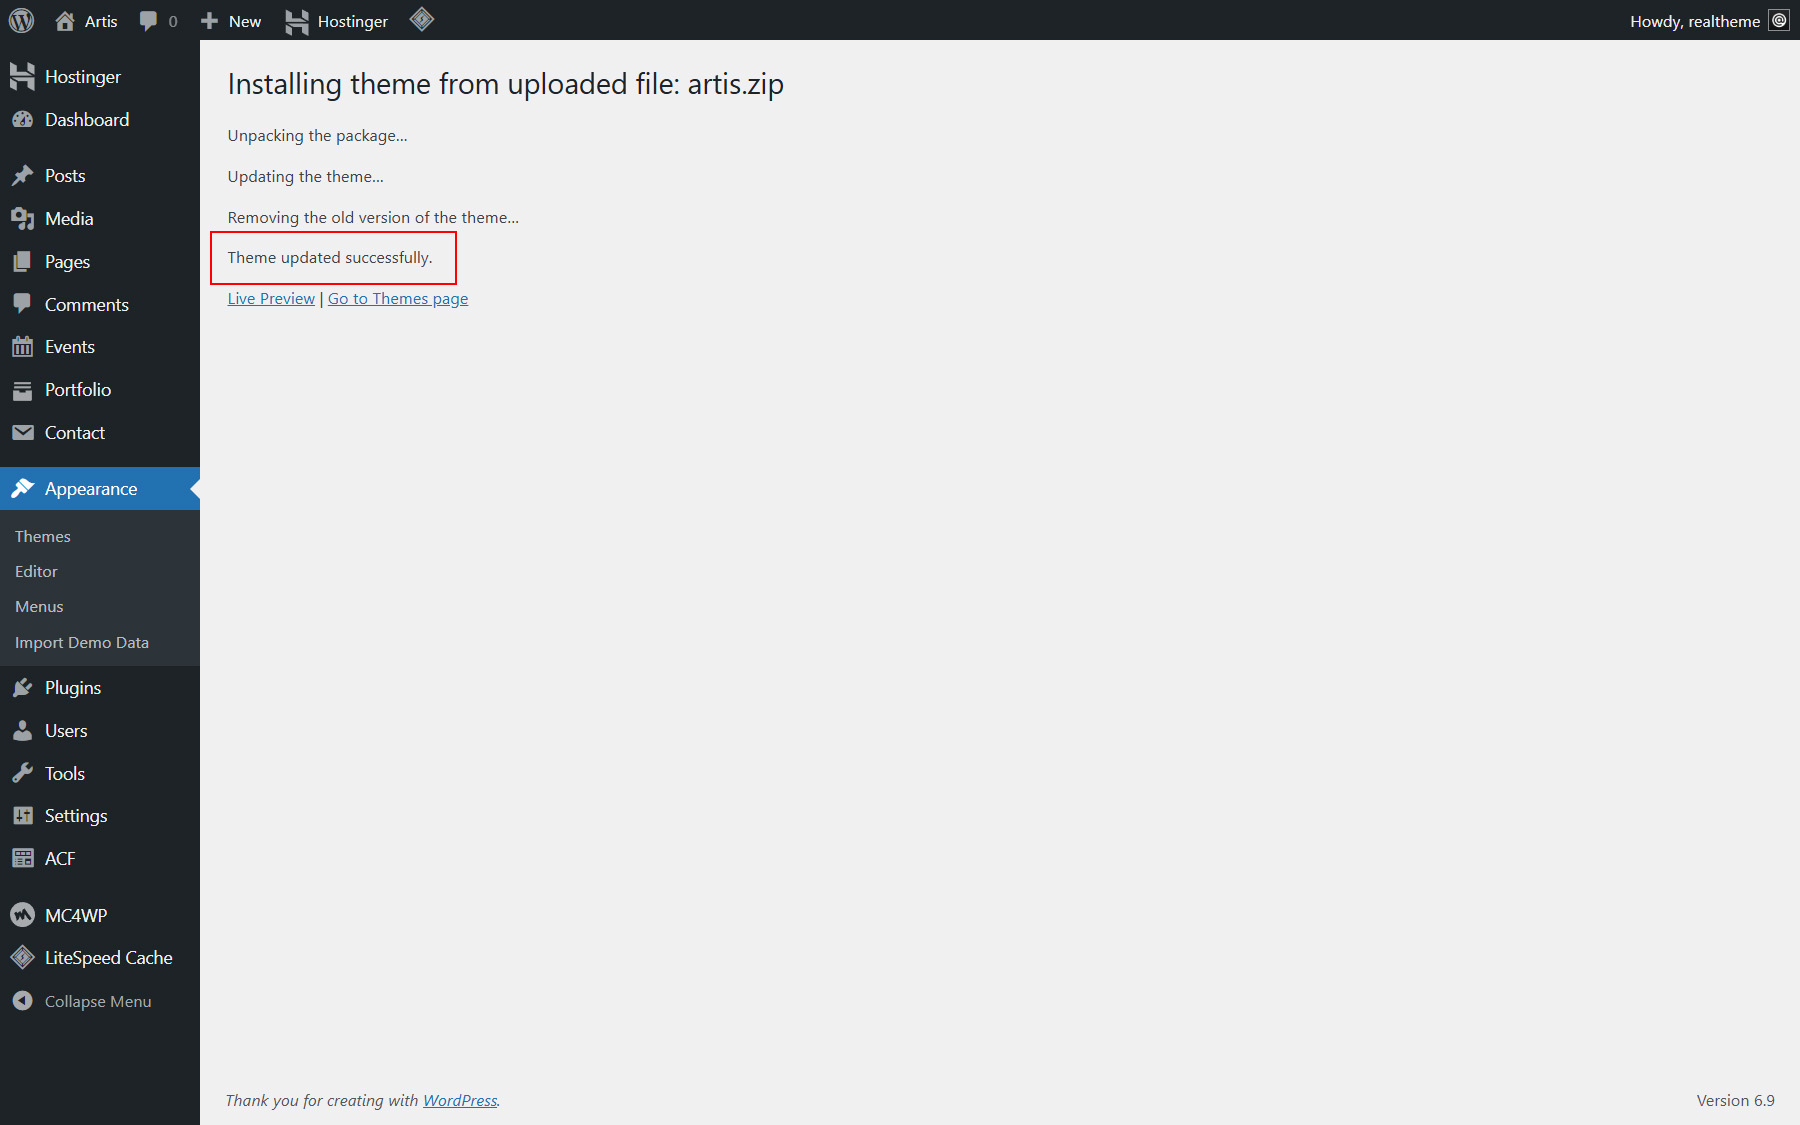
Please wait for the process to finish (See Picture 4).
Set Home and Blog pages (Required)
To display a custom homepage and a separate blog page, you need to configure the WordPress Reading settings and assign the appropriate pages.
-
Log in to your WordPress dashboard.
-
Go to Settings > Reading in the left-hand menu.
-
Under Your homepage displays, select A static page (select below).
-
From the Homepage dropdown, choose the page you want to use as your home page (choose Home) (See Picture 1).
-
From the Posts page dropdown, choose the page that will display your blog posts (choose Blog) (See Picture 1).
-
Click Save Changes to apply the settings.
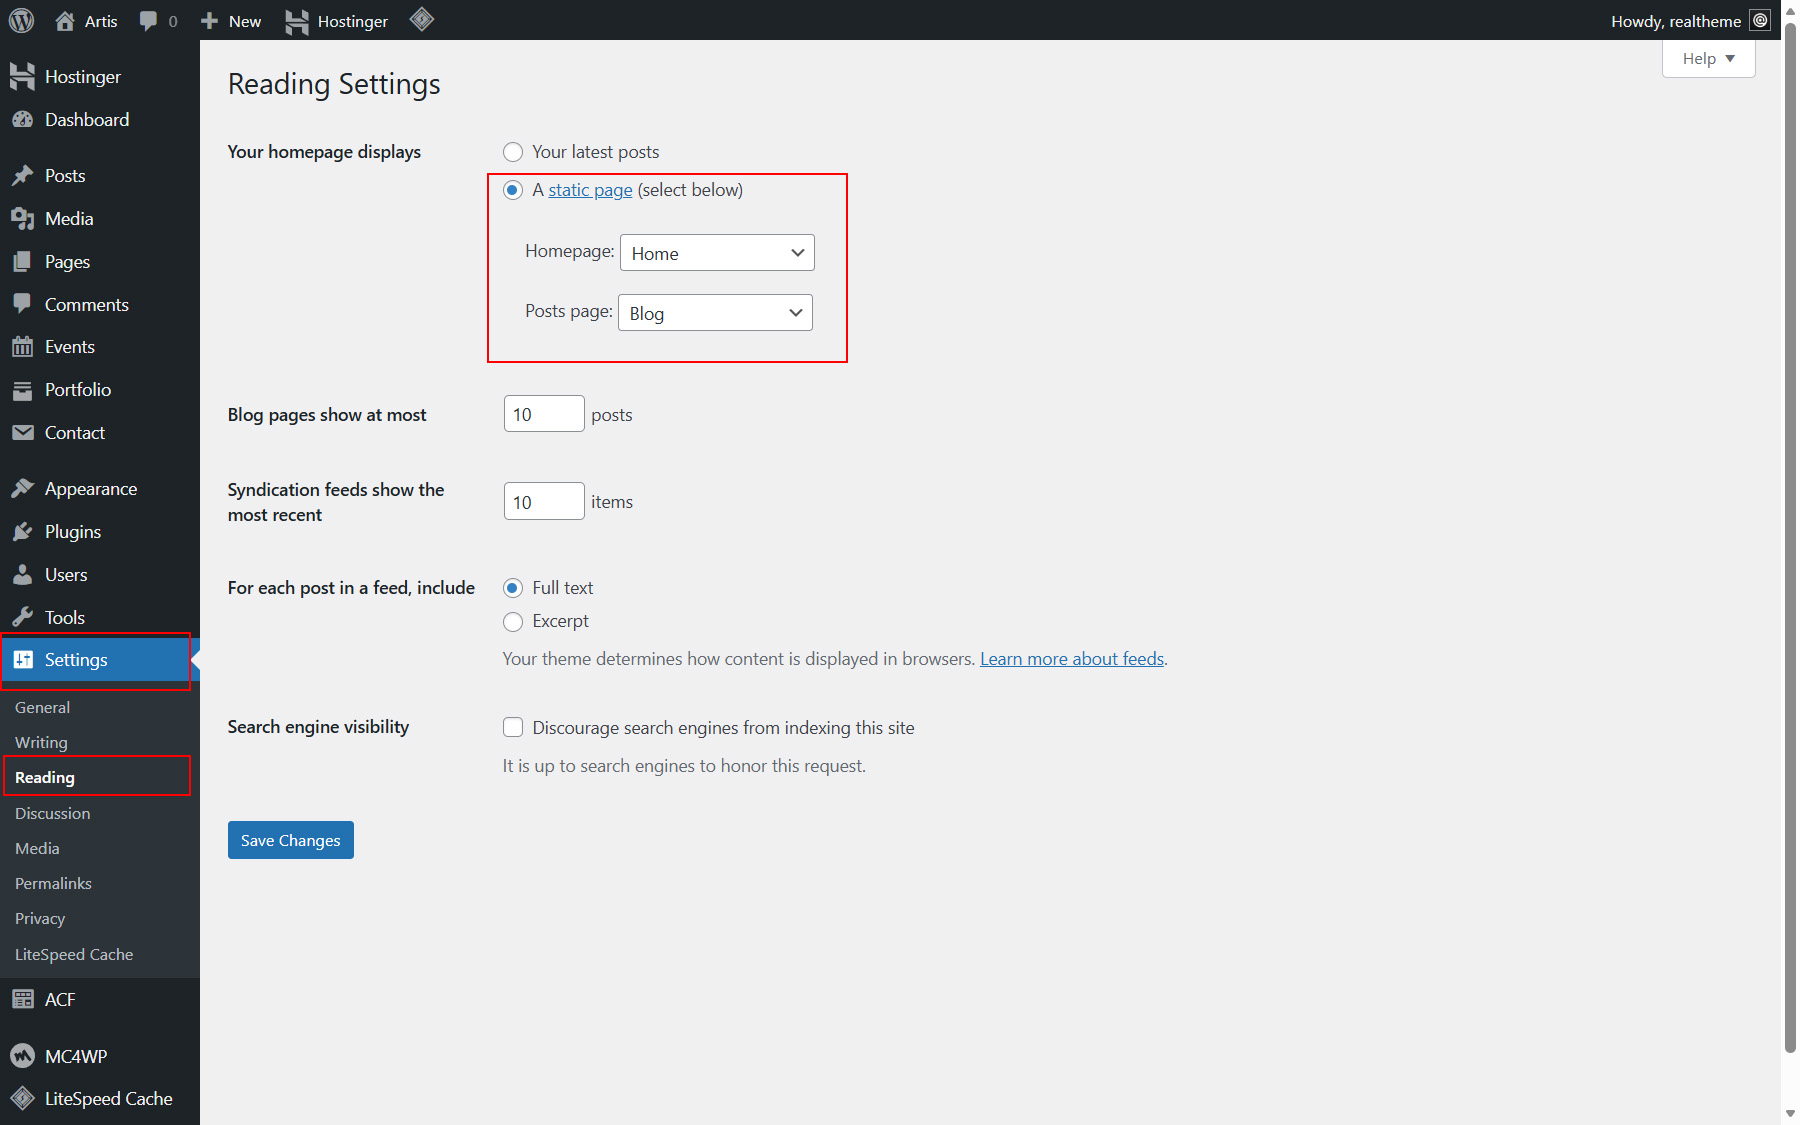
After saving, the selected Home page will be used as the site front page, and all blog posts will appear on the assigned Blog page.
Fix Permalinks and 404 Errors (Required)
This step is required to ensure that the custom post types included in the theme work correctly. After activating the theme, WordPress may not refresh its rewrite rules automatically, which can cause custom post type URLs to return 404 errors. Resetting permalinks forces WordPress to rebuild these rules and properly register all theme-specific content types.
How to reset WordPress permalinks to fix 404 errors
-
Log in to your WordPress dashboard.
-
Navigate to Settings > Permalinks in the left-hand menu.
-
Choose a Post name permalink structure under Permalink Settings and click Save Changes. (See Picture 1)
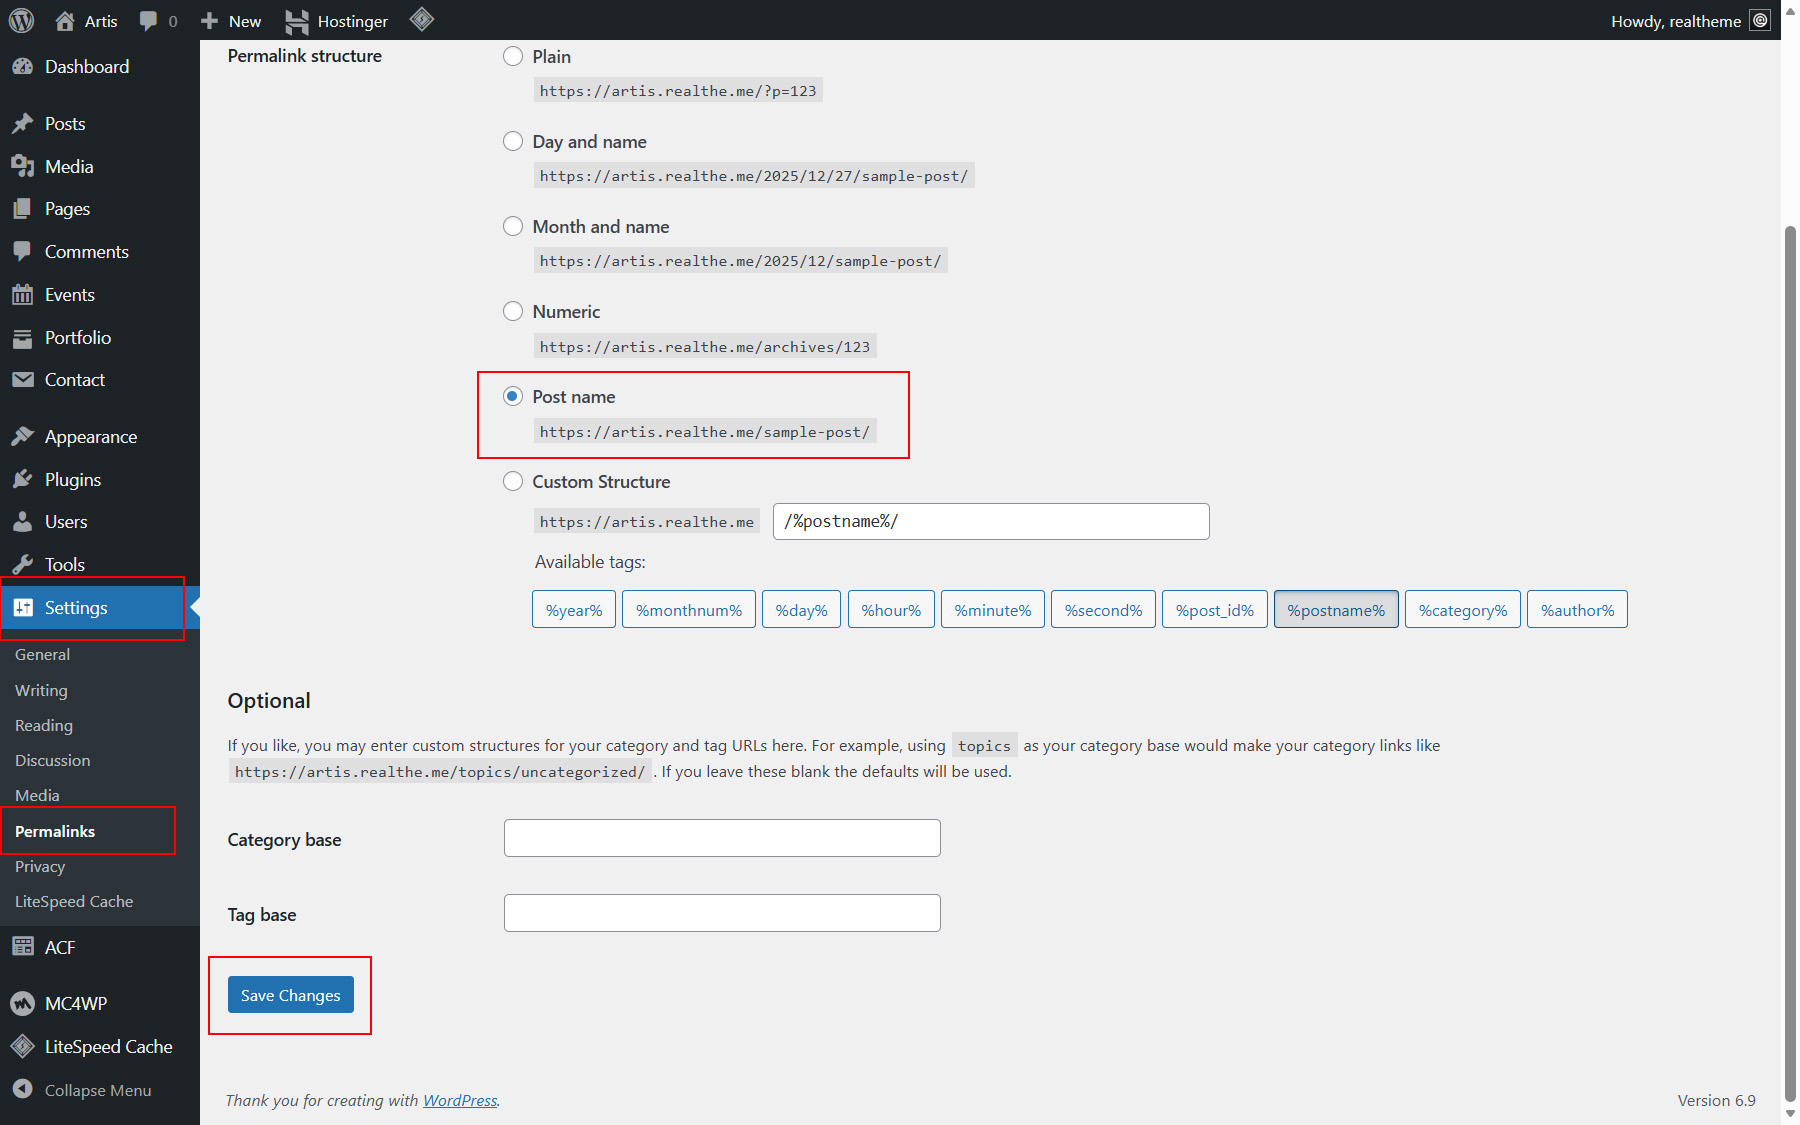
After completing these steps, the 404 error should no longer appear, and your site's URLs will follow the selected permalink format.
Customize menu
The theme provides two menu locations that can be managed directly from the WordPress menu editor. You can assign different menus to each location depending on your navigation needs.
Available menu locations
- Header Menu Location – the primary navigation menu displayed in the site header.
- Header More Menu Location – an additional menu used for secondary links in the header area styled as buttons.
How to assign and edit menus
-
Log in to your WordPress dashboard.
-
Go to Appearance > Menus.
-
Create a new menu or select an existing one.
-
In the Display location section, assign the menu to one of the available locations:
- Header Menu Location
- Header More Menu Location
-
Add, remove, or reorder menu items as needed.
-
Click Save Menu to apply your changes.

Once saved, the updated menus will be displayed automatically in their respective header locations on the front end.
Customize theme font and color styles
This block-based (FSE) theme supports global style customization using the WordPress Site Editor. You can change fonts, colors, and other design settings globally or for individual blocks without editing theme files.
-
Log in to your WordPress dashboard.
-
Go to Appearance > Editor (See picture 1).
-
Click the Styles menu item (See picture 2).
-
Use the Typography and Colors panels to adjust global font families, font sizes, line heights, and color palettes (See picture 2).
-
Click Review changes then Save to apply your changes (See picture 3).
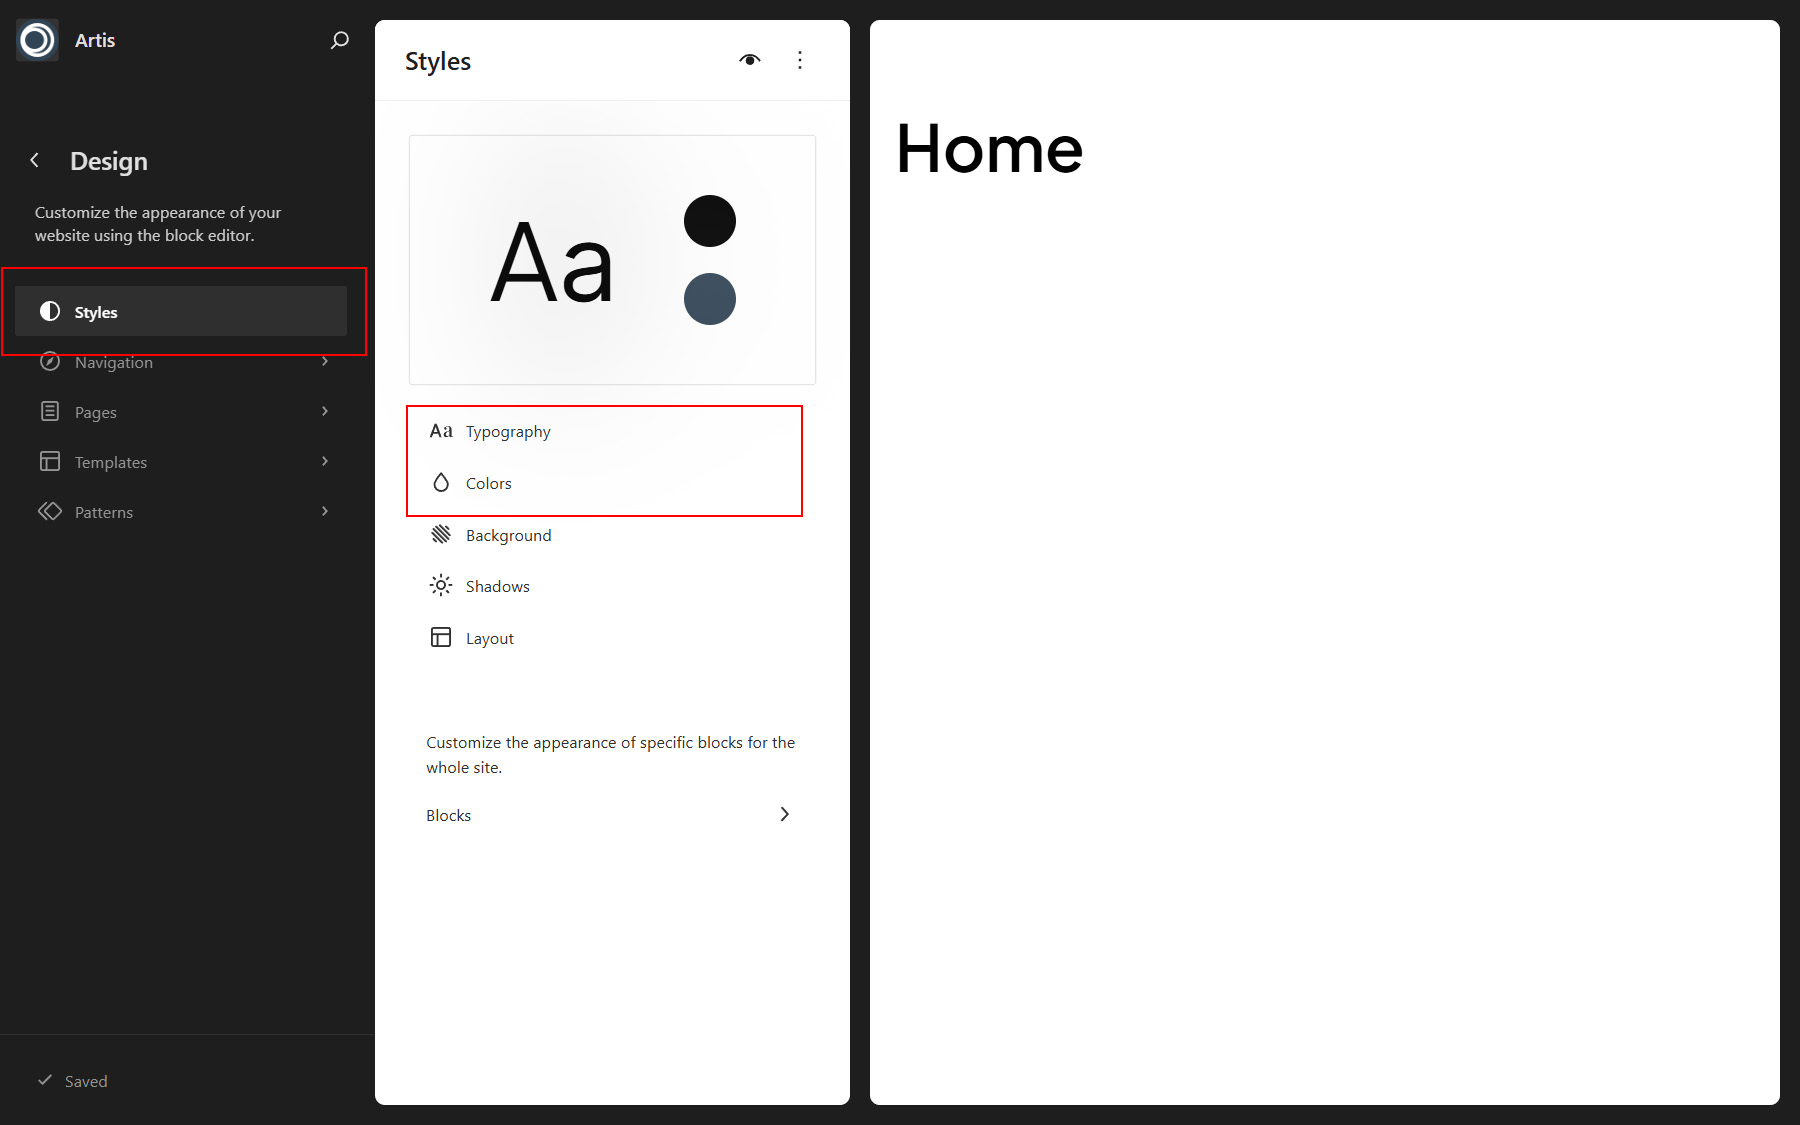
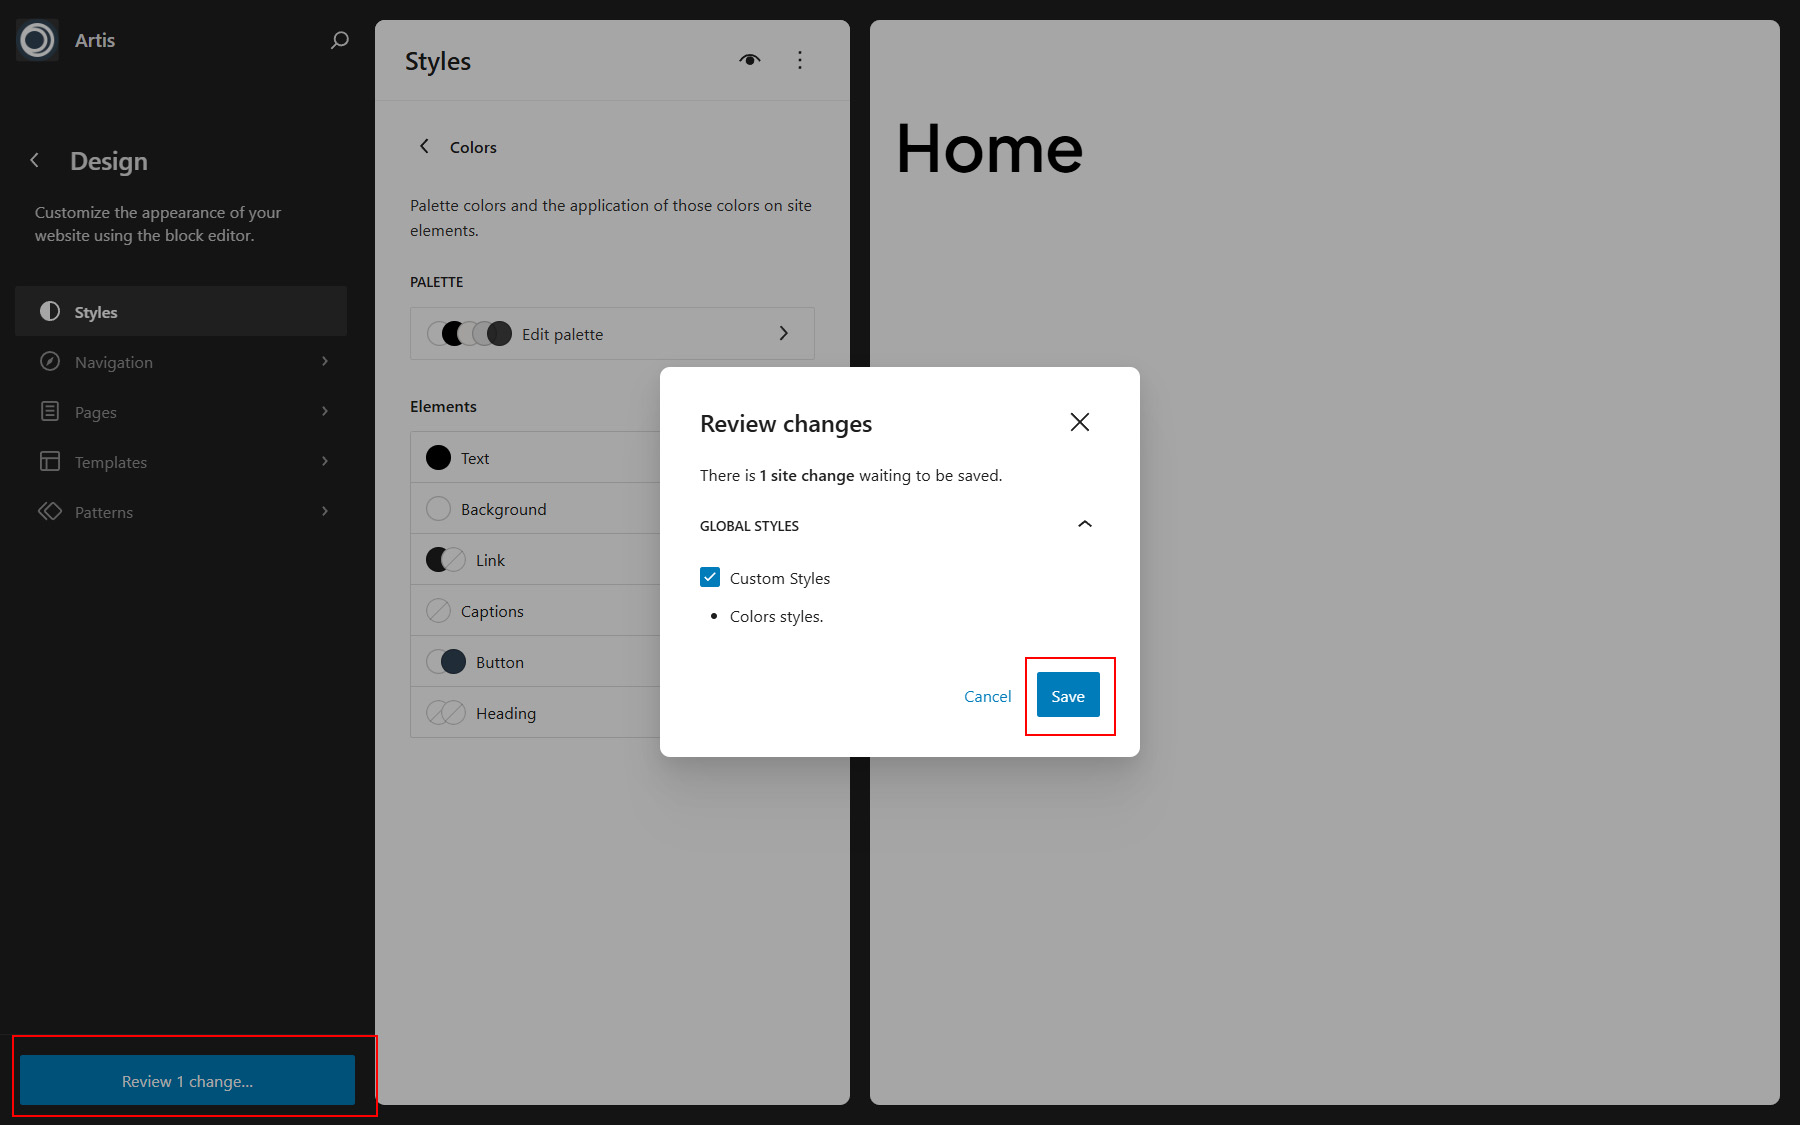
All font and color changes are stored as Global Styles and will be applied automatically across templates and patterns.
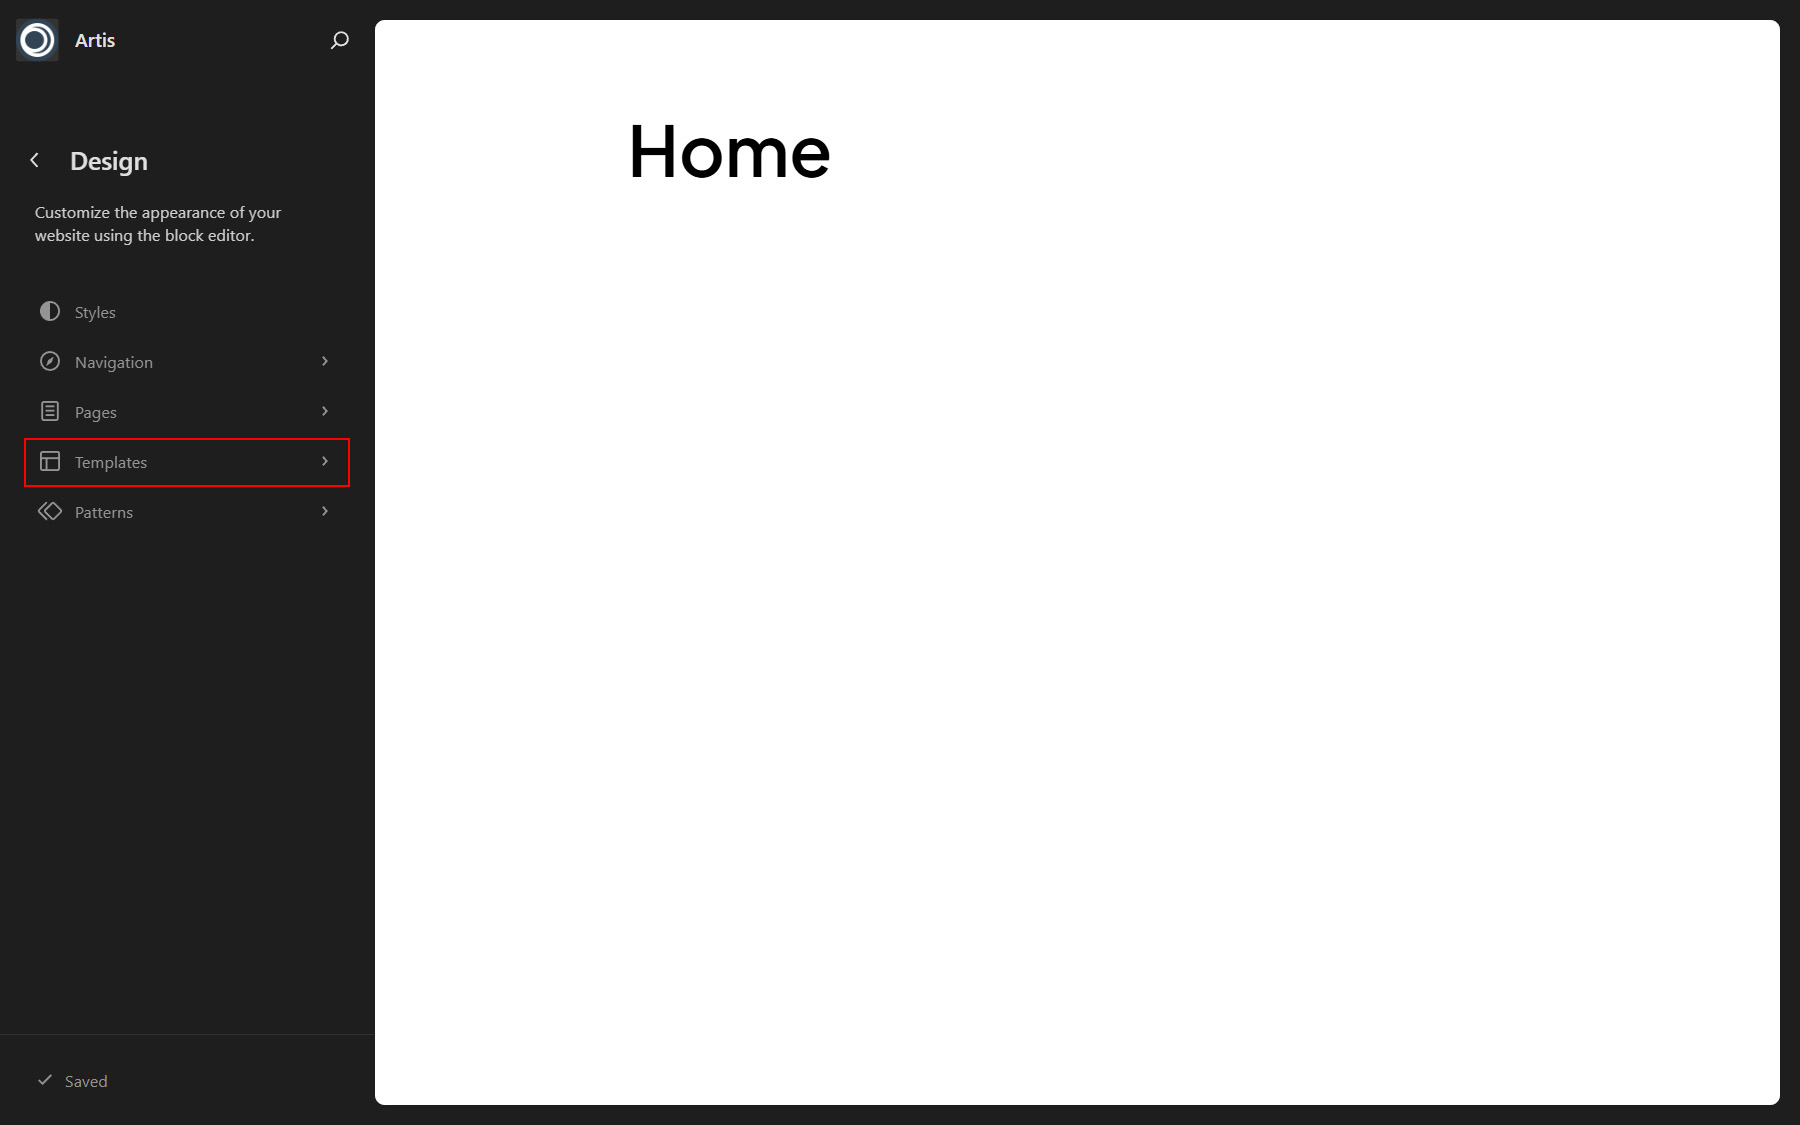
Edit templates in the Site Editor
Block-based (FSE) themes allow you to edit site templates directly using the WordPress Site Editor. This makes it possible to customize the layout and structure of pages such as posts, archives, and special templates without modifying theme files.
The Site Editor and block editing system are powerful and feature-rich tools. Because this is a broad topic with many options and workflows, we strongly recommend reviewing the official WordPress documentation to better understand all available features and best practices. You can find the complete guide here: WordPress Block Editor Documentation .
-
Log in to your WordPress dashboard.
-
Go to Appearance > Editor to open the Site Editor. (See Picture 1)
-
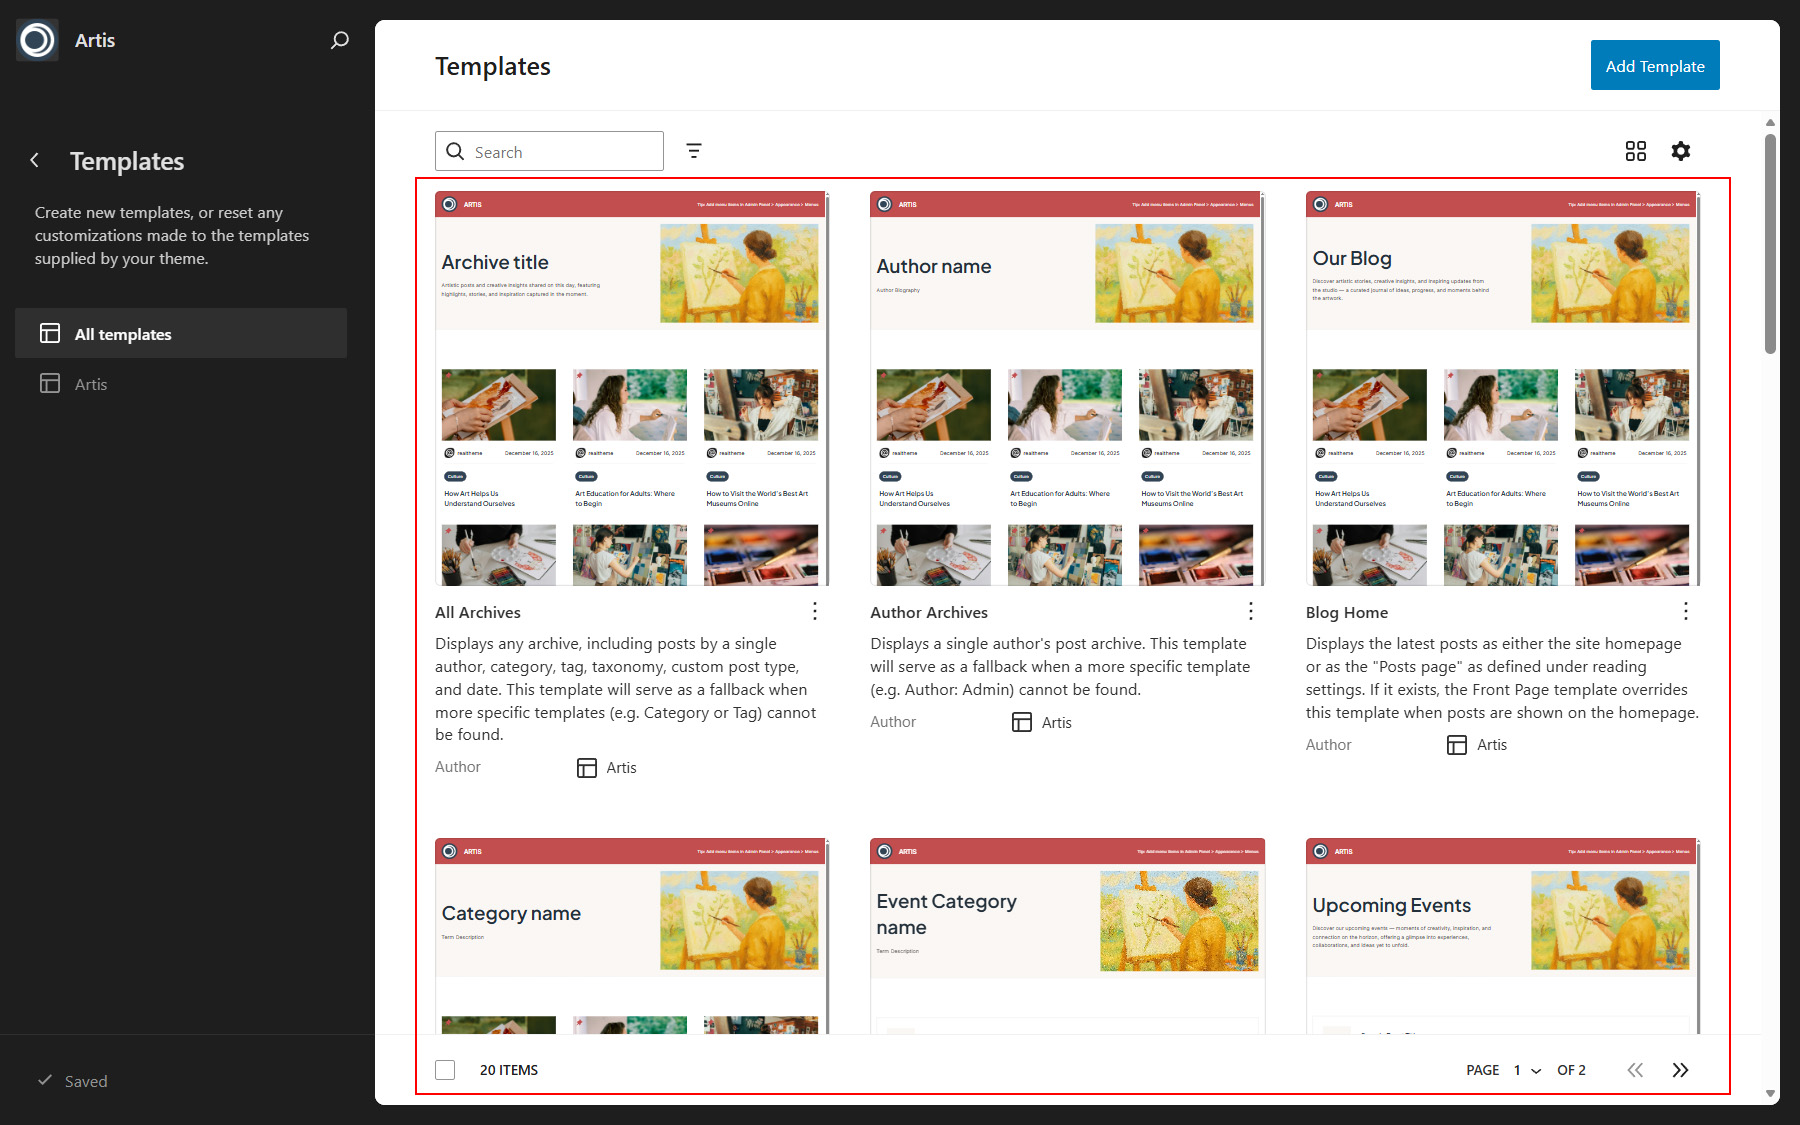
In the left-hand sidebar, select Templates to view the list of available site templates. (See Picture 2)
-
Choose the template you want to edit (for example: Single Post, Page: Home or Page: Contact). (See Picture 3)
-
Use the block editor to add, remove, or rearrange blocks and adjust their settings using the block sidebar. (See Picture 4)
-
Click Save to apply your changes.

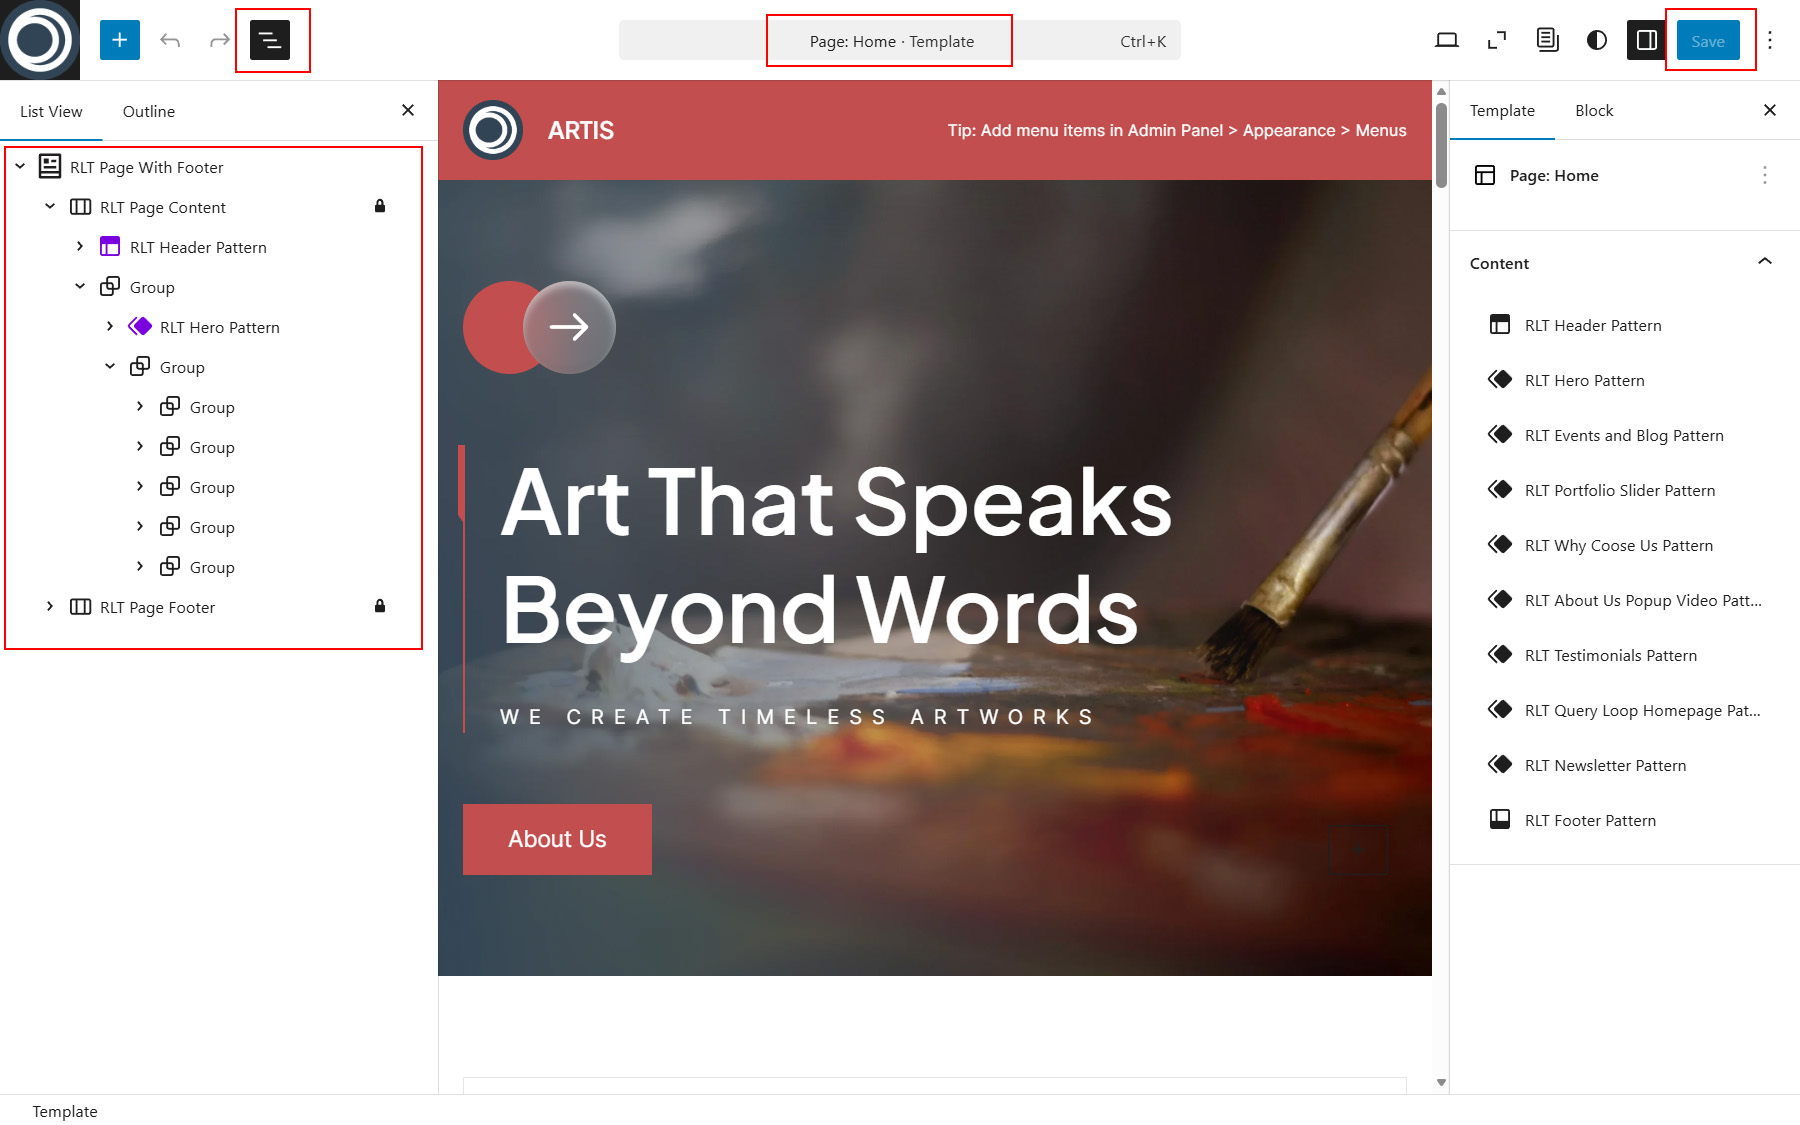
Edited templates are applied automatically to all pages that use the selected template.
Regenerate Thumbnails
The Artis theme includes custom thumbnail sizes (post image sizes), so you may need to regenerate thumbnails to ensure proper display of post images. I recommend using the Regenerate Thumbnails plugin from the WordPress Plugin Directory for this task. For details, refer to the usage instructions on the plugin page.
Translation
The theme is fully translation-ready and comes with a *.pot file located at artis/languages/artis.pot and rltartis-blocks/languages/rltartis-blocks.pot. You can translate the theme and RLT Artis Blocks plugin using Poedit plugin.
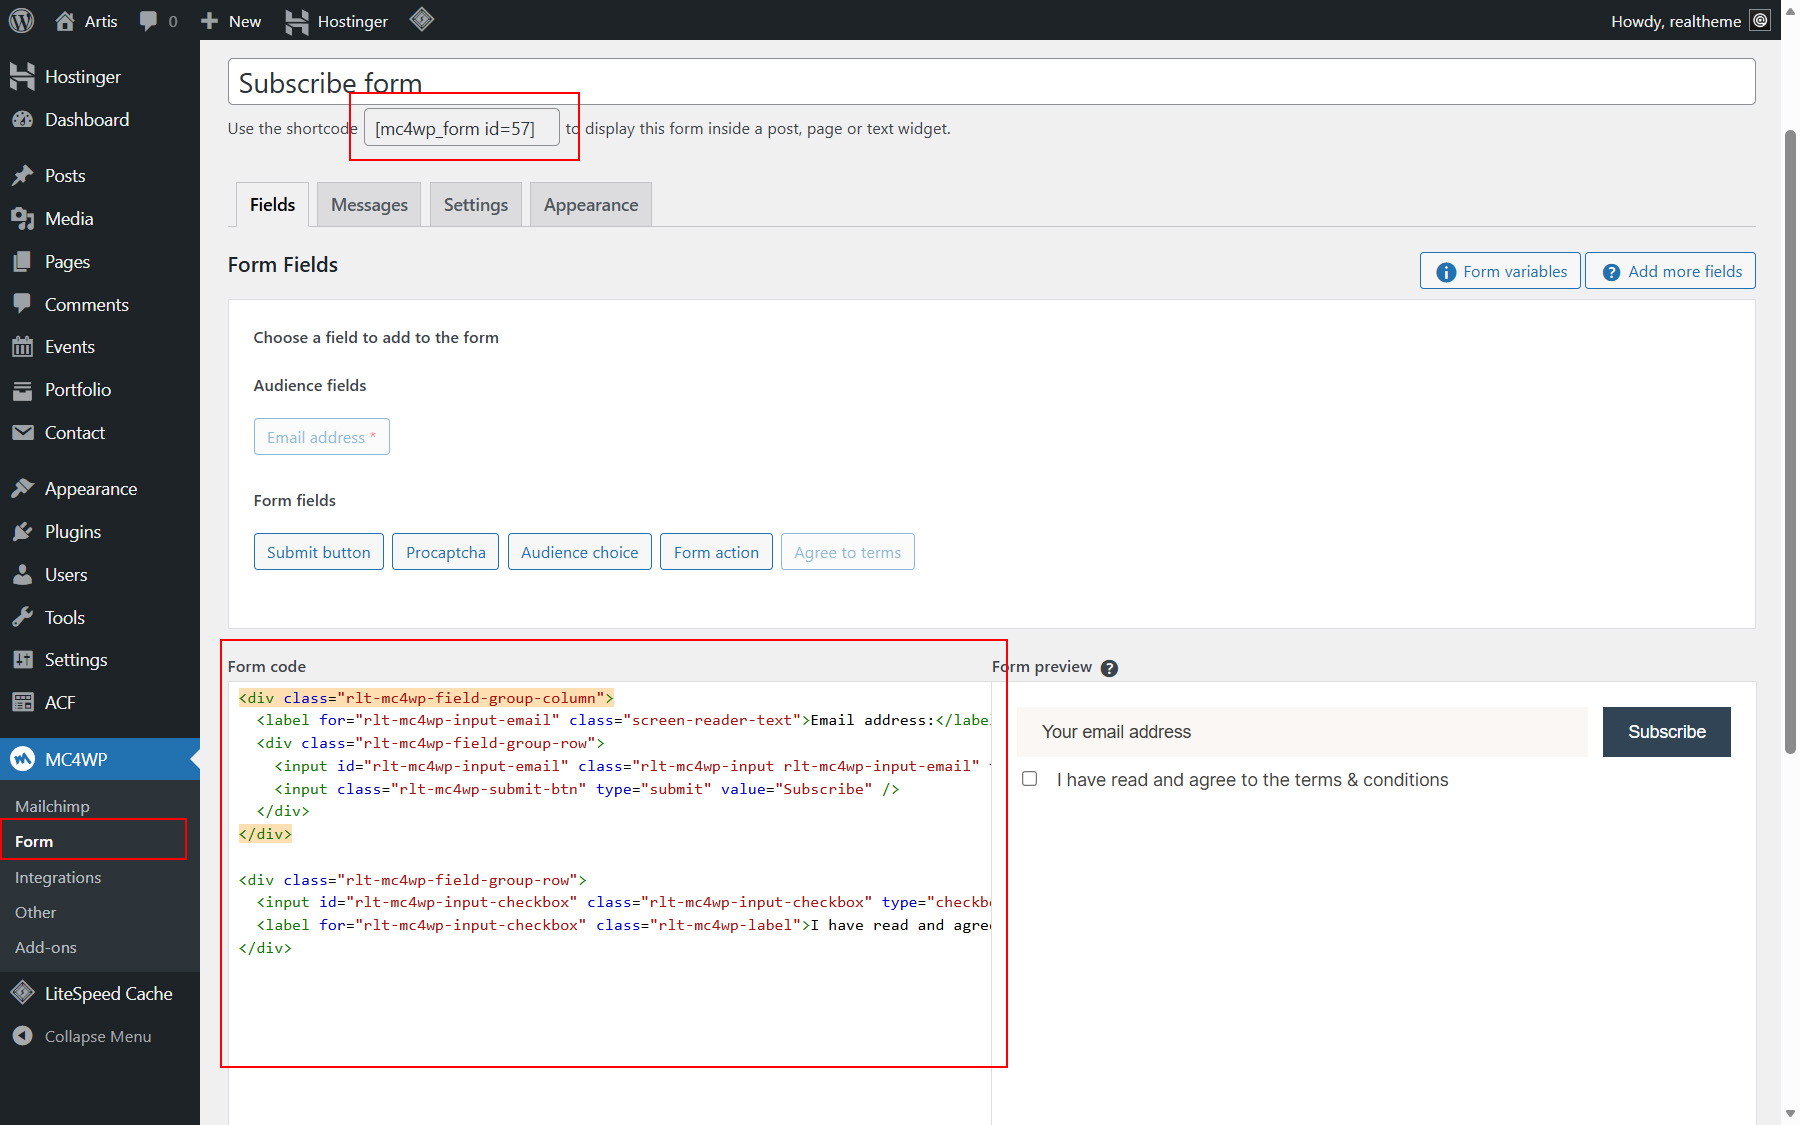
Subscription Form
The subscription form is powered by the MC4WP: Mailchimp for WordPress plugin. If you have this optional plugin installed, you need to create a new form (See Picture 1), copy its shortcode, and then paste it into the RLT MailChimp Shortcode block, which can be found in the RLT Newsletter Pattern (See Picture 2). Please configure the plugin according to the instructions provided by the plugin author. You can use the following HTML code for the subscription form:
<div class="rlt-mc4wp-field-group-column">
<label for="rlt-mc4wp-input-email" class="rlt-mc4wp-label">Email address:</label>
<div class="rlt-mc4wp-field-group-row">
<input id="rlt-mc4wp-input-email" class="rlt-mc4wp-input rlt-mc4wp-input-email" type="email" name="EMAIL" autocomplete="off" placeholder="Your email address" required />
<input class="rlt-mc4wp-submit-btn" type="submit" value="Subscribe" />
</div>
</div>
<div class="rlt-mc4wp-field-group-row">
<input id="rlt-mc4wp-input-checkbox" class="rlt-mc4wp-input-checkbox" type="checkbox" name="AGREE_TO_TERMS" value="1" required="">
<label for="rlt-mc4wp-input-checkbox" class="rlt-mc4wp-label">I have read and agree to the <a href="#" target="_self">terms & conditions</a></label>
</div>

Add Google Maps to your site
You can display a Google Map on your website either by embedding it directly using the Google Maps Embed code or by using a WordPress plugin that provides a shortcode. Choose the method that best fits your workflow.
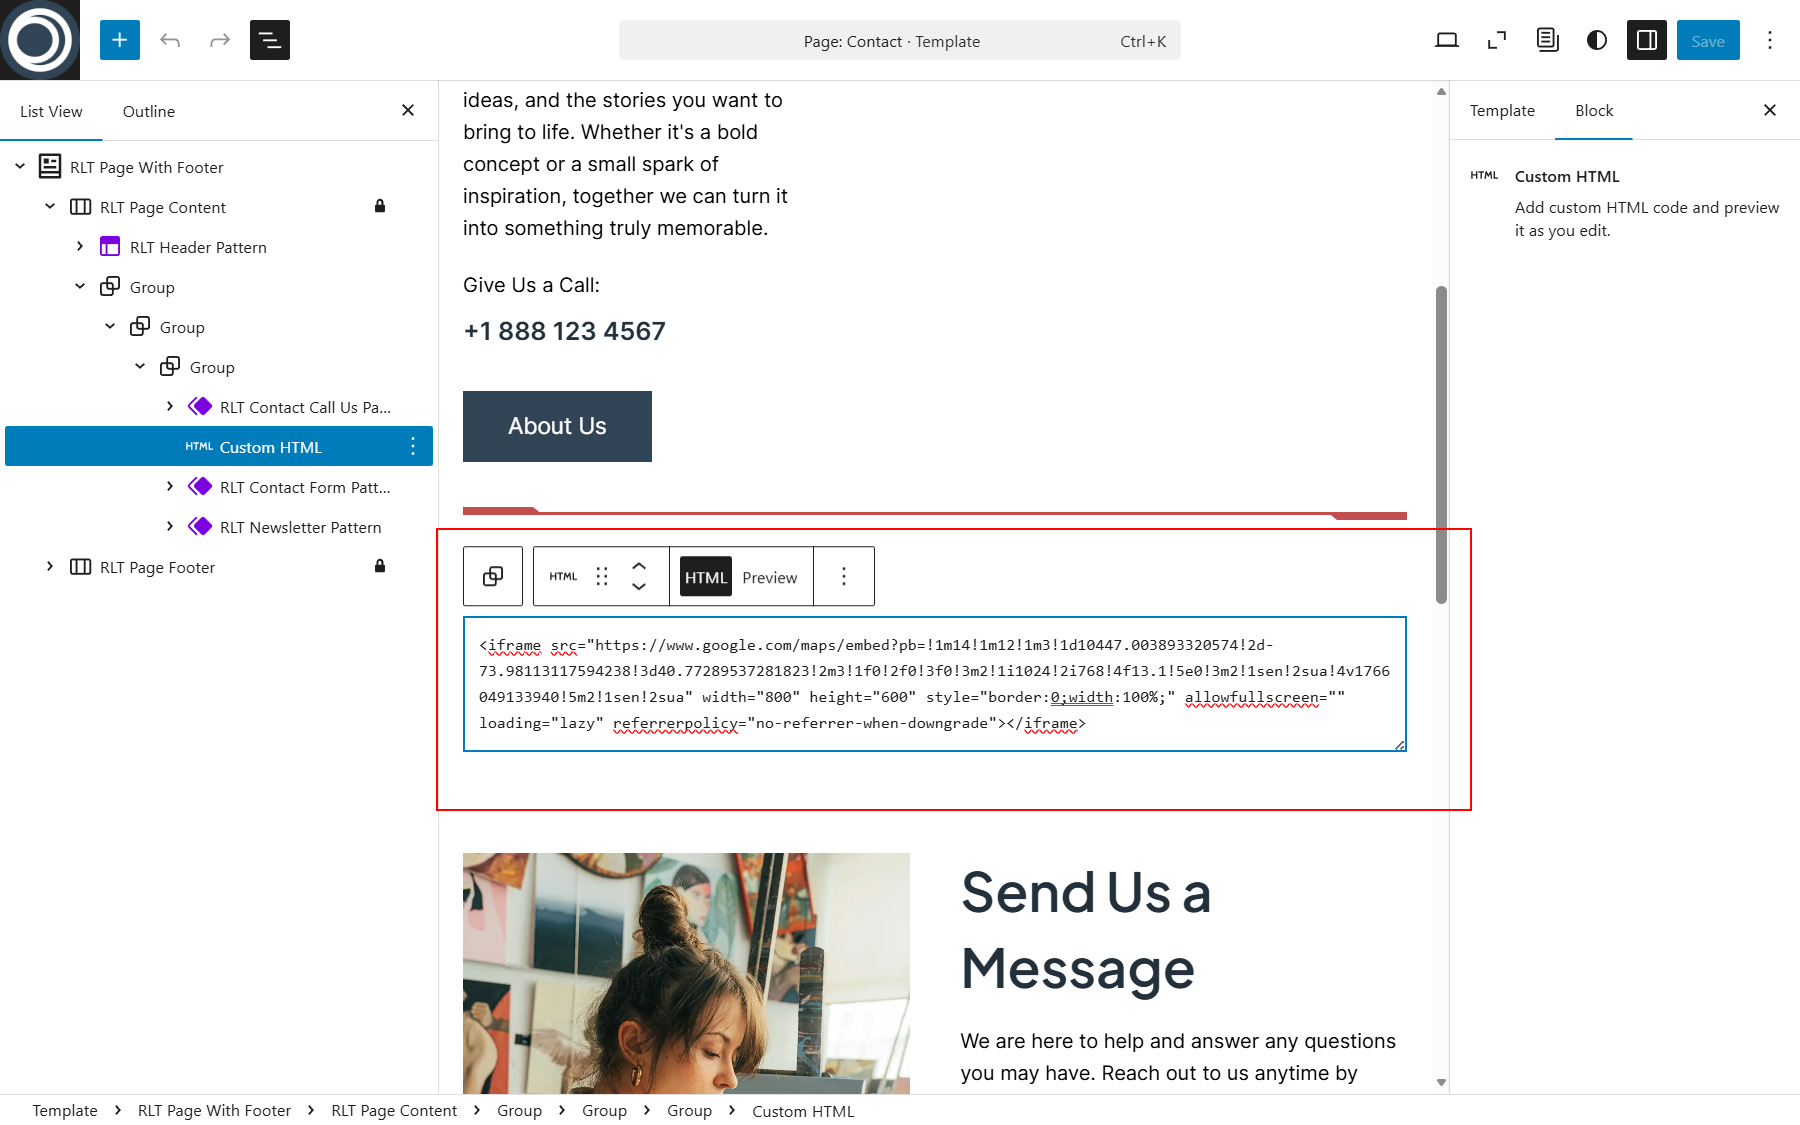
Method 1: Embed Google Maps using a Custom HTML block
-
Go to Appearance > Editor and choose Templates menu item in the left sidebar, select the template where you want to add the map (for example Page: Contact).
-
Click the + button and add a Custom HTML block in the place where you want the map to appear.
-
Open Google Maps and find the desired location.
-
Click Share > Embed a map, then copy the provided iframe code.
-
Paste the iframe code into the Custom HTML block. (See Picture 1)
-
Save your changes.
Method 2: Add Google Maps using a plugin and shortcode
-
Install and activate a Google Maps plugin of your choice.
-
Create a new map inside the plugin settings and copy the generated shortcode.
-
Open the Site Editor or the page where you want to display the map.
-
Add a Shortcode block and paste the map shortcode into it (See Picture 2).
-
Save your changes.
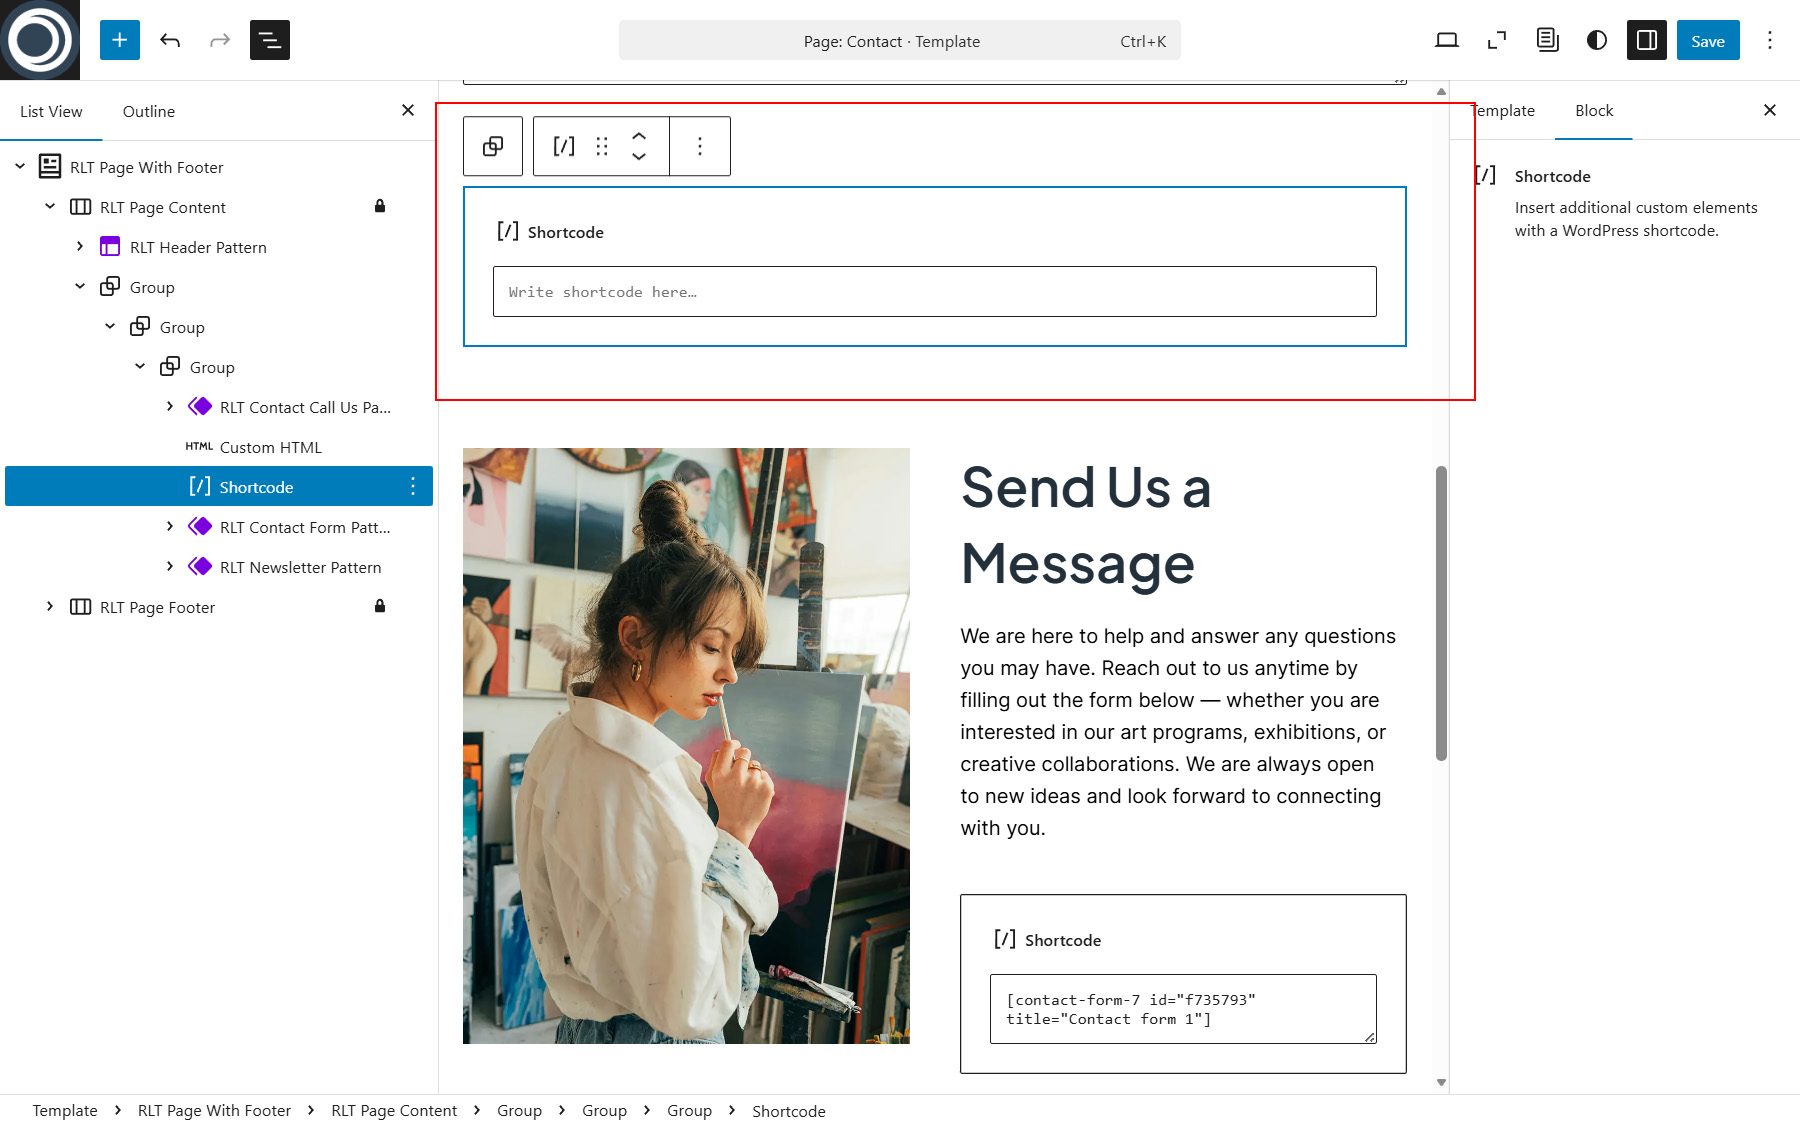
After saving, the Google Map will be displayed on the front end of your website.
Add Contact Form 7 shortcode to the RLT Contact Form Pattern
The RLT Contact Form Pattern uses a Shortcode block to display contact forms. To make the pattern work correctly, you need to insert a Contact Form 7 shortcode into the included Shortcode block.
-
The Contact Form 7 plugin must be installed and activated.
-
Go to Contact > Contact Forms in your WordPress dashboard.
-
Create a new contact form or select an existing one.
-
Copy the generated Contact Form 7 shortcode.
-
Open the RLT Contact Form Pattern in the Site Editor or insert it into a page or template.
-
Select the Shortcode block inside the pattern and paste the Contact Form 7 shortcode into it (See Picture 1).
-
Click Save to apply the changes.
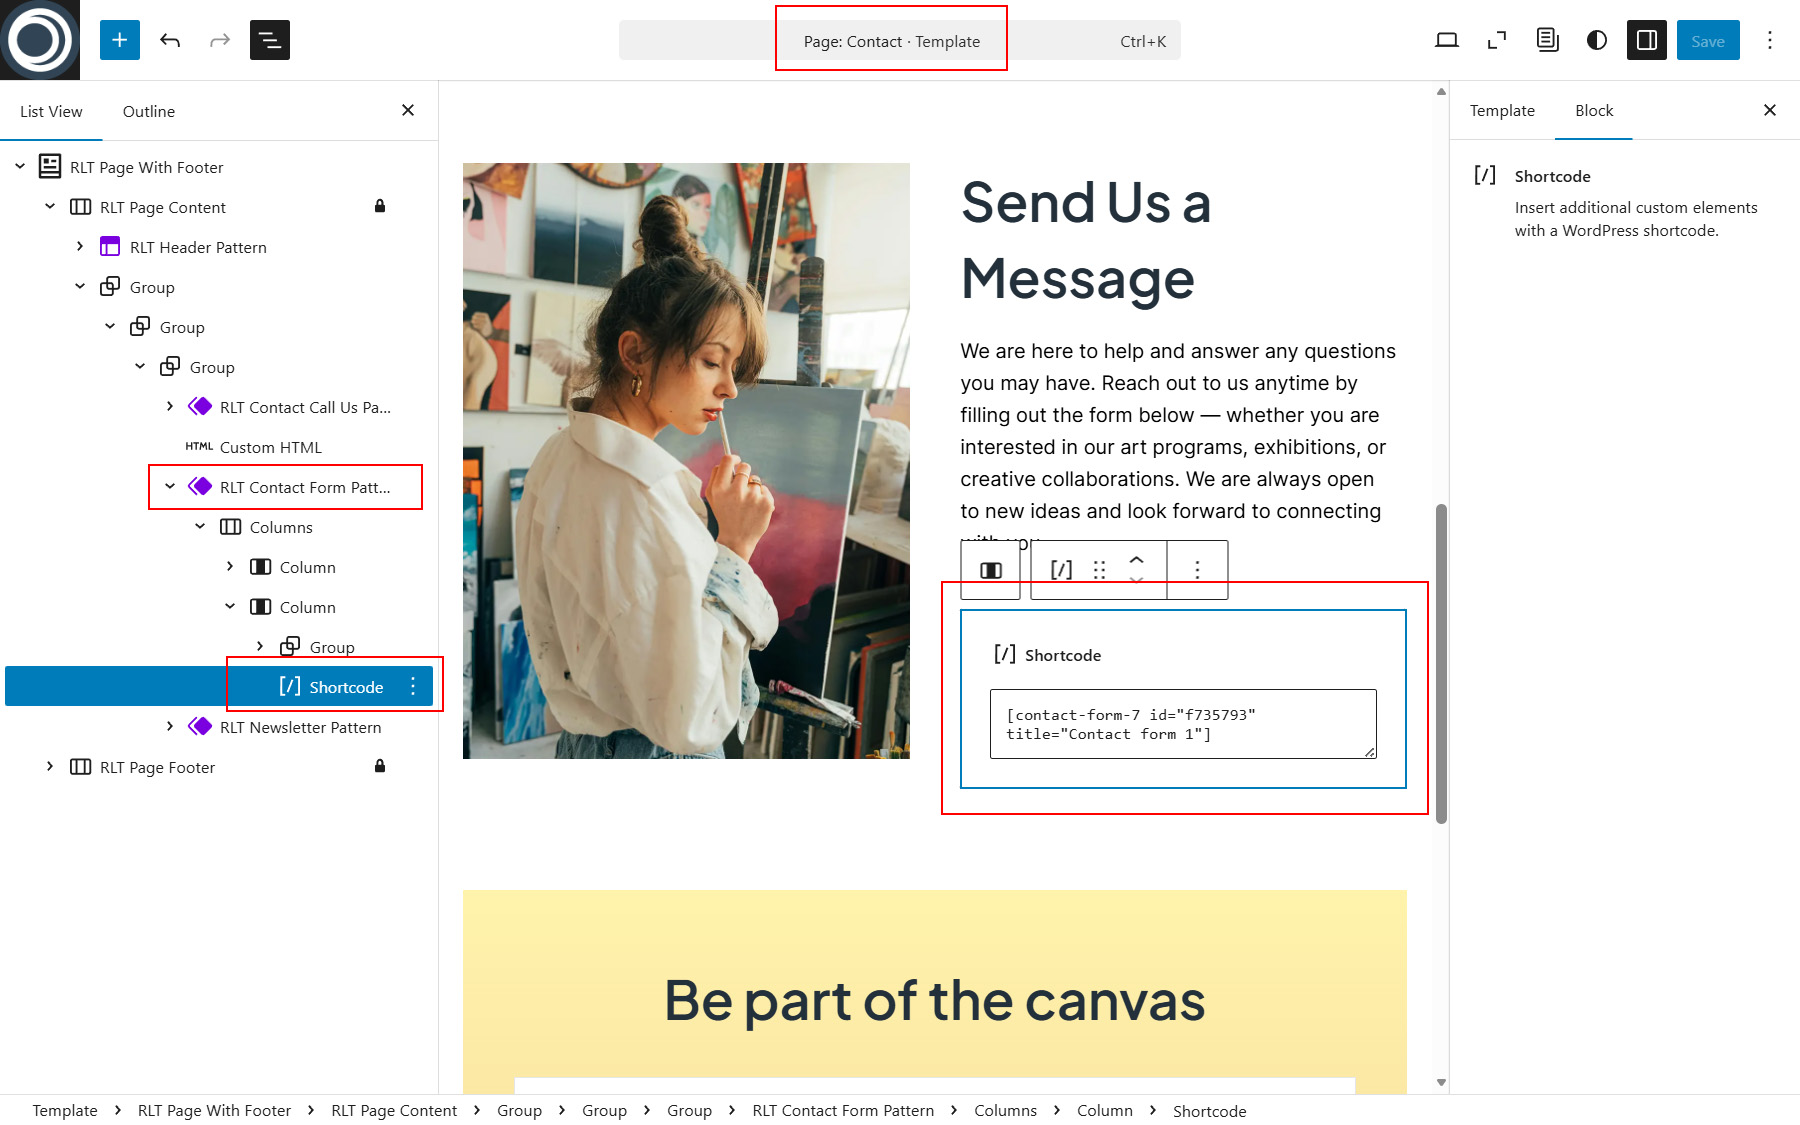
Once saved, the contact form will be displayed automatically wherever the RLT Contact Form Pattern is used.
Useful tips
SVG Uploads
It is not allowed themes to enable SVG uploads as it raises security concerns due to the possibility of attackers executing malicious code through SVG's XML. For this reason, this feature is not enabled by default in my theme. However, you can use third-party plugins such as Safe SVG (https://wordpress.org/plugins/safe-svg/) to enable this feature.
After installing and activating these plugins, you will be able to upload and use vector SVG graphics as a site logo, for example, or in other scenarios.
Changelog
v1.0.0
- Initial release
Credits
Demo site uses the following icon set:
Hugeicons Pro - Free Version
Remixicon
Demo site uses the following images (Images are not included in the purchased ZIP archive):